Pre-built code for this document  To open any JDev project, you need to create an application if not done already. Then choose the .jpr file in File>Open dialog in JDeveloper and select the .jpr (jdev project) file Start JDeveloper. Left click Applications node in the Applications Navigator and select New Application, as shown
  Create an Application named Training. Give “Training” in Application name Select a suitable location and select SOA Application in the Application Template
  The wizard now prompts you to create a project. Later, you can add more projects to this application. Give the project name as Hello World Select Composite template as Composite with BPEL Process. This is a convenient shortcut to tell that the composite we want to create would contain one BPEL process. As an alternative, we can choose Empty Composite here, add a BPEL component later.
  A new dialog opens up. This is to configure the BPEL component that we are adding to our composite. Give name as Hello World_BPEL Select Template as Synchronous BPEL Template and click ok.
  Templates are pre-defined structures provided by Oracle. Essentially, by using a template, a few activities shall come by default, so that you are saved of the mundane steps of adding those activities. It’s even possible to create your own custom templates. As of now, we select the predefined template for a synchronous process. A synchronous process is one which is expected to be comparatively short-lived (few seconds to minutes) and hence can be expected to return a response quite quickly. So, the client invoking a synchronous process can afford to wait (and block) for the response to come back. The following structure comes up.
  This is the picture of the composite (more technically, it’s the design time view of composite.xml). As you can see, it contains a service component called HelloWorld_BPEL and a binding component called helloworld_bpel_client. Service components are the building blocks that you use to construct a SOA composite application. Examples - BPEL, Human Task, Business Rules, Mediators, Spring. Binding component establish a connection between a SOA composite and the external world. They are categorized as Service binding component and Reference binding components. Service binding components provide the entry point to the composite Reference binding components provides access to the external service in the outside world. Examples include JCA Adapters (FTP adapter, DB adapter, Apps adapter etc), HTTP Binding, Direct binding etc. Double click on this component to open it up.
 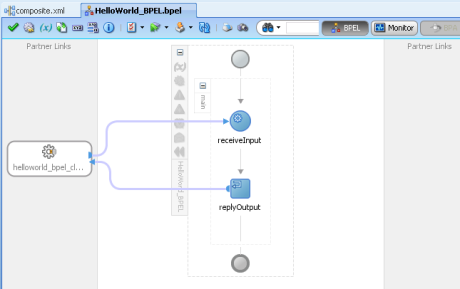 As you can see, there is an input coming from the helloworld_bpel_client service binding (which represents any client that is invoking our BPEL process). Drag an Assign activity from the component palette on the right.
  In this assign activity, we can add any number of “Copy rules”. Copy rules allow us to copy values from a source variable to a target variable, or to assign result of an expression (say a concatenate operation or a square root operation) to a target variable. We want to create an expression similar to “Hello” + Input = Output. This we shall create using the following steps:
 A dialog called Expression Builder opens up. Expression builder is a nifty tool to quickly create expressions. It shows categories of operations. You choose a category and it shows you the expressions within that category. For example
Now press OK. Control returns to Edit Assign dialog. Now expand the outputVariablein the To section (right section) and select client:result field. Press OK  This has completed the Assign activity. For better readability we should always give descriptive names to activities. So double click on the text “Assign1” (not the icon) and give name as “Assign_Hello”
  The BPEL process is now complete !
  Now we shall deploy this to the BPEL Server. Make sure you have created connection to the application server. If not, here are the steps
 In SOA, we always use Standalone. Integrated is used when creating ADF apps. Give a name to the connection, like MyApplicationServer. Select Weblogic 10.3 from the Connection type
  Give Username as weblogic, and password as the weblogic password specified during installation
  If the SOA suite is running on your local system, then enter localhost in the Weblogic Hostname, else give the actual hostname. No need to change ports. In the weblogic domain, give the name of your domain as given in <MW_HOME>\user_projects\domains. For example we have E:\Middleware\SOASuite11gR1PS3\user_projects\domains\SOASuitePS3DevDomain
  After this you can test the connection. All tests should be successful.
  Now go back to JDeveloper and right click the composite “HelloWorld” in the Application Navigator. Select Deploy > HelloWorld
  In the next step, select Deploy to Application Server. Click next Make sure Mark composite as default is checked, click next Select MyApplicationServer. Let it choose the default partition, click finish
  The log window will show that BPEL process is being compiled, and then deployed onto the server.
  Now we want to run this program to see it in action ! Go to EM console now. http://localhost:7001/em/ Expand the tree on the left pane as shown and select HelloWorld
 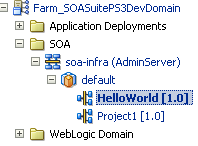 Select Test Button. Then give some string in the input text field. And then press Test Webservice button
 ![]()
 Here EM console is acting like a client to our process. It takes this input, creates a SOAP message and then sends that message to our BPEL process. The output from the BPEL process is shown: You can now also click on the Launch Flow Trace button
 ![]() to see the actual flow of the process. Make sure you allow popups !!. In mozilla, you may see the settings at bottom right corner. The flow trace page will open up
to see the actual flow of the process. Make sure you allow popups !!. In mozilla, you may see the settings at bottom right corner. The flow trace page will open up  Flow Trace page shows the flow of messages through one or more connected SOA composite applications, their services, references, and service components. You can also view and respond to faults occurring in the flow and view composite sensor data collected in the flow. ECID is a unique identifier for this flow (A flow can contain multiple composites, although in this HelloWorld, there is only one composite. SOA server makes sure that all composites invoked during a single flow have this common value, which is used later on to connect them to each other. This ability to identify a flow is something new in 11g). Note, ECIDs are not propagated through business events. To open the BPEL process, click on HelloWorld_BPEL link. It will open in a popup window
  Here you can observe the various activities in Audit Trail as well as Flow tabs. Audit tab is useful if you want to see the times each activity was invoked, inputs and outputs etc. Similar information can also be gleaned from the Flow tab. Click on the flow tab
  dsf While this looks similar to the BPEL diagram we had in JDeveloper, there is a difference. Here the activities are links, and when we click on them, they show more information regarding the data processed. For example, to find out the input, we can click the Receive activity (receiveInput) and see the following
  This completes this exercise.
You liked the article?
Like: 0
Vote for difficulty
Current difficulty (Avg): Medium

TekSlate is the best online training provider in delivering world-class IT skills to individuals and corporates from all parts of the globe. We are proven experts in accumulating every need of an IT skills upgrade aspirant and have delivered excellent services. We aim to bring you all the essentials to learn and master new technologies in the market with our articles, blogs, and videos. Build your career success with us, enhancing most in-demand skills in the market.

