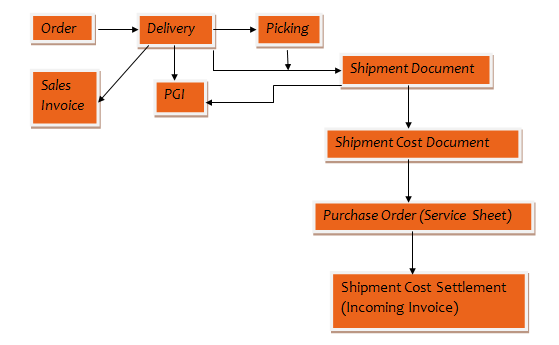
The transportation process explains how to configure the transportation of goods thereby controlling all the necessary activities that take place during the delivery of goods to the customer. In this module, we can discuss the configuration settings required to map all the transportation activities in the SAP system. The following picture explains the process flow in sales with the transportation process.
Setting-1: Transportation planning point.
It is the responsible organizational element for planning the shipment with particular features. Each shipment is assigned to one transportation planning point. For example, if the company has different groups of shipping personnel for organizing the shipment by train, by ship and by road. We need to define the corresponding transportation planning points for each of these groups, i.e., we have to define four transportation planning points.
Defining transportation planning point:
Path: SPRO--->enterprise structure--->definition--->logistics-execution--->maintain transportation planning point.
Go to “new entries” and create the required transportation planning point for the required company code.
Select the “address” icon and specify the required data of the transportation planning point.
Setting-2: Mode of transport.
The mode of transport can be by air or by road or by sea etc. this is used to capture the freight expenses (shipment cost) as well as to implement the transportation functionality. So this step needs to be done to check by which mode of transport the goods are dispatched to the customer. For defining this, go to;
Path: SPRO--->logistics-execution--->transportation--->basic transportation functions--->routes--->define routesàdefine modes of transport.
Go to “new entries” and create the required modes of transport.
Setting-3: Shipping type.
We define the shipping type in combination with the mode of transport as the shipping type specifies the vehicle by which goods can be delivered to the customers. For example, the mode of transport “by road”, we can have different shipping types like a truck, freight car, lorry, container, etc. Depending on the requirement we can have many shipping types for one mode of transport. For defining this, go to;
Path: SPRO--->logistics-execution--->transportation--->basic transportation functions--->routes--->define routesàdefine shipping types.
Go to “new entries” and create the required shipping type with the corresponding mode of transport. For each shipping type, we have to specify the corresponding “shipping type procedure group (STPG)” which is one of the criteria that automatically determines the corresponding pricing procedure for calculating shipment cost.
Setting-4: Creating a vendor master record for the transportation agent/forwarding agent/service agent.
Setting-5: Route determination.
Under this setting, we will see how to define the route with the necessary data and how the system automatically determines a route into the sales order and delivery document.
| Desired to gain proficiency in SAP SD? Explore the sap SD online training to become a pro in SAP SD Training |
Transportation zone: It represents the regions of the delivery shipper (shipping point) and the delivery recipient (ship-to-party). We need to define the transportation zones depending on the country and the client’s requirements. For defining this, go to;
Path: SPRO--->logistics-execution--->transportation--->basic transportation functions--->routes--->route determination--->define transportation zones.
Go to “new entries” and create the required transportation zones for the required country.
Maintaining transportation zone for shipping point: In the definition of the shipping point, we shall specify the transportation zone on the “address” view. The transportation zone specified on the address view will be displayed as a “departure zone” in the details screen of the shipping point.
Maintaining transportation zone for the customer (ship-to-party): We shall specify the transportation zone in the customer master record of ship-to-party on the “address” tab page under the “general data” view.
Transportation group: Specifies the grouping of materials having the same transportation requirements, i.e., all the materials that are to be delivered by the same vehicle will be in one transportation group. This is specified in the material master record on the “sales: general/plant data” tab page.
Path: SPROàlogistics-executionàtransportationàbasic transportation functionsàroutesàdefine routesàdefine routes and stages.
Go to “new entries” and define the route.
In the definition of the route, we need to specify the description, route ID, service agent providing the transportation agent in that route, mode of transport, shipping type, total distance in that route, the total allowed weight in that route and the corresponding lead time like transit time, travel duration, transportation lead time in days and hours.
In the definition of the route, we can also specify the “factory calendar”.
For each route, if required we can maintain different stages. For this, go to; the “routes stages”.
For creating a stage, select the icon “add new entry”.
In the definition of the stage, we need to specify the departure point, the destination point, the service agent providing the transportation, the distance, the shipping type, and the corresponding lead times travel duration and total duration.
In the definition of the stage, the field “stage category” specifies whether that stage is a load transfer point or a border crossing point or a transportation point where the company has its customers.
In the definition of the stage, the field “shipment costs relevance” specifies whether the stage is relevant for calculating the shipment costs. If the requirement is to calculate the shipping costs depending on stages, we have to check this field.
In the definition of the stage, we can also specify the “factory calendar”.
For each route, we can maintain different transportation connection points. For maintaining this, go to; “transportation connection points”.
A transportation connection point can be a load transfer point or a train station or an airport or border crossing point or sea harbour or an inland port.
In the definition of the transportation connection point, we can specify the customs office also.
Select the tab page “reference shipping point/plant” where we can specify the corresponding shipping point and plant from which the goods are transferred to the transportation connection point.
If the transportation connection point is a train station, we can maintain the corresponding point is a train station, we can maintain the corresponding information on the tab page “rail data”. Here we can specify the train station name whether it is a general cargo train or express train etc.
Save the route with the corresponding stages and transportation connection point
Route determination in sales order: While creating the sales order the system automatically determines a corresponding route for each item. For this, the following setting must be done.
Path: SPRO--->logistics- execution--->transportation--->basic transportation functions--->routes--->route determinationàmaintain route determination.
Go to “new entries” and specify the following data.
Country of departure (country of shipping point).
Departure zone (transportation zone of shipping point).
Destination country (country of ship-to-party).
Receiving zone (transportation zone of ship-to-party).
Select the above-entered combination and go to; “route determination without weight group (order)”.
Go to “new entries” and assign the route to the combination of shipping conditions and transportation group.
Route determination in delivery: The shipping document type determines whether the route shall be copied from sales order to delivery or a new route has to be determined into delivery. Because we can know the exact weight of the consignment at the time of delivery only, it is always a best practice to re-determine the route in delivery. For example, an over-weight of goods could mean that now the delivery is too heavy to be delivered by flight and must be conveyed by train.
For this reason the “weight group” is used as an additional factor in deciding the route in delivery. The weight group is determined by the total weight of the consignment. For defining this, go to;
Path: SPRO-->logistics-execution--->transportation--->basic transportation functions--->routes--->route determination--->define weight groups.
Go to “new entries” and create the required weight group with the corresponding weight range.
Now we shall assign the route by using this weight group. For this, go to the previous SPRO screen and select “maintain route determination”.
Select the required combination of the country of departure, departure zone, the destination country, and receiving zone and go to; “route determination with weight group (delivery)”.
Go to “new entries” and assign the route to the combination of shipping conditions, transportation groups, and weight groups.
Note: By using the delivery document type we shall specify whether the route shall be copied from order to delivery or a new route shall be determined into delivery. For configuring this, go to;
Path: SPRO--->logistics-execution--->transportation--->basic transportation functions--->routes--->route determination--->define new route determination by delivery type.
Select the required delivery type and specify whether the route shall be copied from order to delivery or a new route shall be determined into delivery.
Note: Unlike the sales order items where each item can have a separate route, all the items in the delivery must have same route.
Setting-6: Maintaining transportation relevance.
In this step, we specify the transportation relevance for the delivery types, delivery item categories, and the routes. The delivery types and the corresponding item categories for which the transportation is to be carried out must be characterized as relevant for transportation, and all those that are used for shipment must also be relevant for transportation. For configuring this, go to;
Path: SPRO--->logistics-execution--->transportation--->shipments--->maintain transportation relevance.
Select the required delivery type and check the field “relevant for transportation”.
Here if required we can specify a shipment blocking reason for the delivery document. If we specify the required reason for the shipment block, that reason will be displayed in the delivery document on the “shipment” tab page at the header level. For creating a shipment document concerning that delivery, we have to remove the shipment blocking reason in that delivery document.
Depending on the requirement we can define our own reasons for shipment block. For this, go to;
Path: SPRO--->logistics-execution--->transportation--->shipments--->define blocking reasons for shipments.
Go to “new entries” and create the required shipment blocking reasons.
Select the required delivery item category and check the field “relevant for transportation”.
Select the required route and check the field “relevant for transportation”.
Setting-7: Defining shipment type.
While creating the shipment document, we have to specify the corresponding document type for that shipment document which is called shipment type. For this, first, we need to define the shipment type with the desired functionality. For this, go to;
Path: SPROàlogistics-executionàtransportationàshipmentsàdefine shipment types.
Go to “new entries” and define the required shipment types with the following functionality.
Document category: The value ‘8’ is the document category for the shipment documents.
range internal/external assignment: Specifies the no. ranges that either the system (if it is internal) or the user (if it is external) used for giving the no’s for the shipment documents when they are saved.
Before specifying the no. ranges here first we have to define them. For this, go to;
Path: SPRO--->logistics-execution--->transportation--->shipments--->define no. ranges for shipments.
Screen sequence group: The standard screen sequence group for all the shipment documents is ‘T’.
Shipment completion type: By using this field we shall specify whether the shipment document is an outbound shipment or inbound shipment. Apart from this we also need to specify whether it is loaded shipment or empty shipment.
Shipping type: Specifies the default shipping type for the shipment document. The shipping type specified here will be copied by default into shipment document which if required can be changed in that document.
Service level: Specifies how the transportation has to be handled for a customer, i.e., by using the service level we can specify whether it is a general shipment or an express shipment. We can use the service level for the analysis of the shipment document.
Process control: Specifies how the shipment document type is going to be used while creating the shipment document, i.e., here we need to specify whether it is an individual shipment with single/several modes of transport or collective shipment with single/several modes of transport. Individual shipment means creating one shipment document with reference to one delivery document where as creating one shipment document with reference to multiple deliveries is called collective shipment.
Adopt route: Specifies whether the route shall be copied into shipment document with or without stages.
Application: Specifies the application ‘V7’ for issuing the output for shipment documents.
Output determination procedure: Specifies the corresponding output determination procedure for the shipment document.
Pick check: Specifies whether the shipment document shall be created for a fully picked delivery only or even for partially picked delivery.
Weight unit: Specifies the default unit of measure for displaying the weight in the shipment document.
Volume unit: Specifies the default unit of measure in which the volume is displayed in the shipment document.
Note: These default units of measure can be changed in the shipment document if required. Save the shipment type.
Setting-8: Defining shipment cost type and item category.
While creating the shipment cost document we have to specify the corresponding document type. For defining this document type, go to;
Path: SPRO--->logistics-execution--->transportation--->shipment cost--->shipment cost document--->shipment cost types and item categories.
For the shipment cost type “document category” is ‘a’.
We need to specify the corresponding no. ranges (internal/external).
For defining these no. ranges, go to;
Path: SPRO--->logistics-executionàtransportation--->shipment costàshipment cost document--->define no. ranges for shipment costs.
The standard screen sequence group is ‘F’.
The field “overall status for shipment” specifies when the shipment document is completed.
For the shipment cost type, we need to maintain the corresponding item categories. For this, go to; “define item categories”.
Pricing date: Specifies the date depending on which the system calculates the shipment cost.
Partner function: Here we need to specify the partner based on which the shipment cost is calculated. Here we need to specify the partner function ‘FA’ for the forwarding agent.
Item determination group: It is one of the criteria to automatically determine the corresponding pricing procedure for calculating the shipment cost.
Account assignment category: Specifies whether the accounting of the shipment cost item has to be effected via a cost center or profit center. As the shipment cost has to be reflected to a corresponding cost center, here we need to specify the value ‘K’ for the cost center.
Settlement date: Specifies the date depending on which the shipment cost has to be settled to the transportation agent.
Settlement relevance: Specifies whether the shipment cost item is relevant for settlement or not. If the company is hiring the transportation agent for delivering the goods, the shipment cost item shall be relevant for settlement. If the transportation is carried out by the company itself, it is not relevant for settlement.
Generate PO: By using this field, we can configure the system in such a way that it automatically generates a purchase order which is valid for one day or one week or one month for the specified shipment cost. Save the item category.
Now we need to assign the item category to the corresponding shipment cost type. For this, select the shipment cost type and go to “assign shipment cost type and item categories”.
Go to “new entries” and assign the item category. Here we need to specify whether the shipment cost can be calculated at header level or stage level (border crossing point or load transfer point).
Setting-9: Maintaining the shipment cost relevance and default for shipment type.
In this setting, we will assign the shipment cost type to the shipment type, so that while creating the shipment cost document with reference to shipment document, the system automatically determines the corresponding shipment cost type. For configuring this, go to;
Path: SPRO--->logistics-execution--->transportation--->shipment cost--->shipment cost document--->shipment cost relevance and default for shipment cost type.
Select the required shipment type and assign the corresponding shipment cost type.
Select the required combination of shipment type and shipment cost type and go to; “define shipment cost relevance for shipment type”.
For each shipment type here we shall specify whether the shipment cost is calculated at header level or leg level or load transfer point level or border crossing point level.
Setting-10: Configuring pricing for calculating shipment cost.
Path: SPRO--->logistics-execution--->transportation--->shipment costsàpricing---> pricing control.
Define price dependencies (condition tables).
Create condition tables.
Create the required condition tables with the corresponding key fields like service agent, tariff zone, shipment route, ship-to-party, freight class, shipping type, etc.
Define access sequences.
Create an access sequence and place the required condition tables in it.
Define condition types.
We can use standard condition types like FB00, FS00, FK00, etc.
Define and assign pricing procedures.
Maintain pricing procedure.
Define a pricing procedure and place the required condition types in it. The standard procedure is SDFC00.
Define and assign the shipping type procedure group.
Go to “new entries” and create the required shipping type procedure group. For example, for all those shipping types (truck, container, etc.) where the shipment cost is the same, we can create one shipping type, procedure group. Now we need to assign the shipping type procedure group to the required shipping types. For this, go to; “assign shipping type, procedure group”.
Select the required shipping type and assign the shipping type procedure group.
Define and assign the item procedure group.
Go to “new entries” and create the required item determination procedure group.
We need to assign this value to the item category of shipment cost document. For this assignment, go to; “assign item procedure groups”.
Select the required item category and assign the required item determination procedure group.
Define service agent procedure group.
Go to “new entries” and create the required service agent procedure group. For example, for all those service agents providing transportation by road we can have one group, providing transportation by train we can have another group, etc.
We shall specify this value in the vendor master record of service agent for the field “service agent procedure group” on the view “control”.
Define pricing procedure determination for shipping costs.
Select the required transportation planning point and go to; “determine pricing procedure”.
Go to “new entries” and assign the pricing procedure to the combination of item determination procedure group, service agent procedure group and shipping type procedure group.
Maintaining condition record for shipping costs:
Path: logistics--->logistics-execution--->master dataàtransportation--->shipment costs--->pricesàTK11-create.
We can maintain the shipment costs by using the condition type FB00.
For FB00 we need to maintain the condition record by using tariff zone. For this, first, we have to configure tariff zones as described below.
Tariff zones: In order to maintain the shipment costs in different geographical locations will be divided into different tariff zones and then specify in which tariff zone the departure point (shipping point) exists and in which tariff zone the destination point (ship-to-party) exists. For defining the tariff zones, go to;
Path: SPROàlogistics-executionàtransportationàshipment costsàbasic functionsàdefine and assign tariff zones.
Go to “new entries” and define the required tariff zones.
Select the created tariff zone and go to; “define an organizational key for tariff zone assignment”.
Go to “new entries” and enter the required combination of transportation planning point, service agent, shipping type and country.
Select the above-entered combination and go to; “assign tariff zone to organizational key and postal code area”.
Go to “new entries” and assign the tariff zone to the required postal code (of shipping point of ship-to-party).
Note: Whatever the postal codes we have maintained in the shipping point and ship-to-party, for the same only here we shall assign tariff zones.
Path: SPROàlogistics-executionàtransportationàbasic transportation functionsàmaintain freight code sets and freight codes.
The freight codes are used to communicate the precautions to the transportation agent that are to be followed during the transportation of the material.
The forwarding agent uses the freight codes injection with the freight code set for the classification of goods to be transported. We have to configure the freight code sets along with freight codes in the following way.
Define material freight groups.
Go to “new entries” and create the required material freight group.
Note: This value shall be specified in the material master record on the view “sales: general/plant data”.
Define forwarding agent freight groups.
Go to “new entries” and create the required carrier freight groups to be used for the transportation agents.
Note: This value shall be specified in the vendor master record of transportation agent for the field “carrier freight group” on the view “control”.
Freight codes: sets, codes, determination.
Go to “new entries” and create a freight code set which is the group of freight codes.
Select the created set and go to; “define and assign freight class”.
Go to “new entries” and create the required freight code with the corresponding freight class. For example, which dispatching the computers the precautions you need to follow for the components are explained by freight codes. So different components may have different freight codes. But all the freight codes of the component can have one freight class, for example, “hardware” based on which we maintain shipment cost.
We need to assign these freight codes to the corresponding materials. For this, go to; “freight code determination”.
Go to “new entries” and assign the required freight codes to the material freight groups.
Configure freight code set determination.
Go to “new entries” and assign the freight code set to the combination of carrier freight group, departure country, and shipping type so that the freight code set will be automatically determined into shipment document.
Note:
After configuring tariff zones and freight class now, we shall maintain condition records for shipment costs. For this, go to; ‘TK11’.
Path: logistics--->logistics-execution--->master data--->transportation---> shipment costs--->scales--->VS01-create.
Enter the required ‘scale basis’ (example ‘D’ (gross weight)).
Specify the description for scale ID.
Specify the “scale type” as ‘A’ (base-scale).
Specify the corresponding “scale unit of measure” (weight).
Enter the required scale values with the calculation type as ‘A’ (absolute).
Example:
| Gross weight | Calculation type |
| 200 | A |
| 400 | A |
| 500 | A |
| 800 | A |
In this example, we are going to maintain different shipping costs for different weights range.
Select the tab page “calculation” and specify the “calculation rule” (‘D’ (gross-weight)).
Save the scale ID.
We need to specify this scale ID while maintaining the condition record.
After entering the scale ID in the condition record, we have to maintain the corresponding amounts (shipment costs) for the scale values (weight range).
Save the condition record.
Setting-11: Assigning the purchasing data.
When we save the shipment cost document, the system automatically creates a purchase order based on which we can settle the shipment cost to the transportation agent by creating the incoming invoice. For this, we have to assign the organizational units in transportation to the relevant organizational units in purchasing. For this, go to;
Path: SPRO--->logistics-execution--->transportation--->shipment cost--->settlement--->assigning purchasing data.
Go to “new entries” and enter the required combination of transportation planning point, shipment cost type, purchasing organization, purchasing group and plant.
Setting-12: Maintaining account determination for posting shipment cost to the corresponding G/L account.
While settling the shipment cost to the transportation agent by creating an incoming invoice, the shipping cost shall be posted to the corresponding G/L account. For this, we have to assign the required G/L accounts to the combination of fields. For this assignment, go to;
Path: SPRO--->logistics-execution--->transportation--->shipment costs--->settlement--->automatic G/L account determination (OBYC).
“Cancel” the pop-up box and select the button “account assignment”.
Double-click the “transaction” key ‘GRB’.
Enter the required “chart of accounts”.
Select the icon “new entries”.
Enter the required combination of valuation modification (0001), general modification (VBR), valuation class (3200) and assign the required G/L account (417000).
Note: First we shall create this G/L account ‘417000’ in your company code by using the transaction code FS00.
Setting-13: Maintaining account assignment categories.
In the definition of item category of shipment cost document, we have specified the account assignment category as K which specifies that the shipment cost has to be reflected in a corresponding cost center. For defining this account assignment category, go to;
Path: SPRO--->logistics-execution--->transportation--->shipment costs--->settlement--->maintain account assignment category.
Setting-14: Maintaining account determination for controlling assignment.
To post the shipment cost to the corresponding cost center, the following setting must be done.
Path: SPRO--->logistics-execution--->transportation--->shipment costs--->settlementàautomatic determination of CO assignments.
Go to “new entries” and enter the required company code, cost settlement (417000), and the cost center (9030).
Note: Before making this assignment, the following settings must be configured.
Maintaining a controlling area for company code.
| Read these latest SAP SD Interview Questions that help you grab high-paying jobs! |
Path: SPRO--->enterprise structure--->definitionàcontrolling--->maintaining controlling area--->maintain controlling area.
In the definition of controlling area the ‘currency’ and the ‘fiscal year variant’ must be the same as that of company code.
Now we shall assign the controlling area to company code. For this, go to;
Path: SPRO--->enterprise structure--->assignment--->controlling--->assign company code to controlling area.
Select the required controlling area and go to; “assignment of company codes”.
Select the button “new entries” and enter the required company code.
Create a cost element.
Path: SPRO--->controlling--->cost element accounting--->master dataàcost elements--->create cost elements--->create primary cost element.
Enter the controlling area assigned to your company code.
Enter the required cost element (417000) and the validity period. Press “enter”.
On the “basic data” tab page specify the name and description as ‘purchased services’ and specify the ‘cost element category’ as ‘1’.
Save the cost element.
Creating a cost center.
Path: SPRO--->controlling--->cost center accounting--->master data--->cost centers--->create cost centers--->create cost center.
Enter the required cost center (9030) and the validity period.
On the “basic data” tab page specify the name and description as “shipment costs”.
Specify the “cost center category” as ‘9’.
Specify the hierarchy area (H1900), company code, business area (9900).
Save the cost center.
Note: After these three settings only we have to configure the 14th setting.
Step-1: Create sales orders.
Step-2: Create delivery. Complete the picking but not the post goods issue.
Step-3: Create a shipment document.
Path: logistics--->logistics-execution--->transportation--->transportation planning--->createàVT01N-single documents.
Note: We can search for the existing packaging materials by using the material type ‘VERP’. If required we can create our own packaging materials by going to;
Path: logistics--->sales and distribution--->master data--->products--->material---> packaging material--->MMV1-create.
Planning: If we select this option, it means that transportation planning is completed, i.e., identifying the forwarding agent, route, etc.
Note: The moment we select planning the system automatically determines the corresponding route and the forwarding agent from the delivery. For this, we have to specify the routine ‘7’ for the field “copy routine” in the definition of shipment type.
After completing planning select the tab page “tender” and for the field “tender status” specify the value “accepted by forwarding agent”.
Check-in: It means that the vehicle used for transportation enters our premises.
Loading start: We have to click this button when the load of the material is started.
Loading end: We have to click this button when the load of the material is completed.
Shipment start: It means that all the transportation papers are made ready.
Shipment end: It means that the gate pass is ready for the vehicle to leave the premises.
Shipment completion:
When we select this option, we have to enter the “external ID” given to that shipment by the transportation agent for tracking purposes.
Enter that external ID and select the button “copy”.
For each of the above activities, we can also specify the execution date and time.
Save the shipment document.
Path: SPRO--->logistics-execution--->transportation--->shipments--->define and assign activity profiles.
For the shipment type, the system displays all different activities like planning, loading start, loading finish, shipment beginning, shipment end, and shipment completion. We have to specify at which level the system shall complete post goods issue for the deliveries so that at that level we shall maintain the activity profile. For example, if the requirement is that the system shall complete the PGI at the time of shipment completion, we shall maintain the activity profile for the field “at completion”.
Enter the required activity profile and select the button “maintain”.
Save the profile.
For the profile, we can maintain the following functionalities.
Do not issue log: If we select this option the system will not update the log in the shipment document.
Issue log if errors or warnings occur: If we select this option the system updates the log during the processing of shipment document.
Always issue log after save: This option updates the log after saving the shipment document.
Save log: If we check this option, we can see all the logs for different shipment documents by using the transaction code VT05.
No goods issue posting: If we select this option, we have to manually complete PGI for the deliveries.
Carry out goods issue posting during save: If we select this option, the system automatically completes goods issue for the deliveries when we save the shipment document
Carry out goods issue posting in the background: If we select this option, the system automatically completes the goods issue in the background. Save the activity profile.
Note: In the shipment document itself we can see the shipment cost. For this in the shipment document overview screen, select the icon “freight cost estimate”.
Step-4: Creating a shipment cost document.
Path: logistics--->logistics-execution--->transportation--->shipment costs--->create--->VI01-single document.
Specify the shipment document no.
It is not required to enter the shipment cost type as it is automatically determined by the system because we have already assigned shipment cost type to shipment type. Press “enter”.
The system copies the data from the shipment document and calculates the net value (shipment cost).
The shipment document becomes an item in the shipment cost document.
On the “status” tab page the field “calculated” specifies whether the shipment cost is fully calculated or not, the field “assigned” specifies whether the G/L accounts are fully configured or not for posting the shipment cost and the field “transferred” specifies whether the shipment cost is transferred to controlling or not. By default, the status will be not transferred for the field “transferred”.
To transfer the shipment cost to controlling, check the field “transfer” for the shipment cost item. It will be transferred after saving the document.
In the item data, the system displays the corresponding pricing information of the shipment cost item.
Here the system also displays the delivery documents for which the shipment cost is calculated.
Note: When we save the shipment cost document, the system automatically generates a purchasing document/entry sheet for the specified shipment cost. To see this, go to item data of shipment cost item and select the tab page “service procurement”.
Step-5: Creating shipment cost settlement (incoming invoice).
Go to MIRO and create the incoming invoice with reference to the purchase order/service entry sheet.
Step-6: Create a sales invoice for the customer.
Go to VF01 and create.
Maintaining the shipment cost profile: If required we can estimate the shipment cost in the sales order itself. For this, we shall configure the shipment cost profile along with the planning profile. For this, go to;
Path: SPROàlogistics-executionàtransportationàshipment costsàdefine profiles for shipping cost information.
Go to “new entries” and define the profile.
In the definition of the profile, we have to specify the description and the corresponding transportation planning point, shipment type, and the pricing procedure by using which the shipment cost is going to be calculated.
For the shipment cost profile, we have to maintain the corresponding planning profile. For this, go to; “assign planning profile”. Here we can assign the standard planning profile (0001-01).
Save the profile.
We need to specify this shipment information profile in the definition of the sales document type for the field “shipment cost information profile”.
Estimating the shipment cost in the sales order:
Go to VA01 and create the sales order.
In the sales order overview from the main menu select, extrasàshipment cost information.
Enter the required service agent and select the button “execute”.
For the field “net value” the system updates the estimated shipment cost.
Determining freight for the customer into sales invoice from shipment cost: While creating the sales invoice for the customer, the shipping cost paid to the transportation agent can be copied as freight into that invoice. For this, the following settings must be done.
Setting-1: Whatever the condition type we are using in the main pricing procedure (RVAA01) for calculating the freight in the invoice, the same condition type must be there in that pricing procedure used for shipping cost calculation.
While placing this freight condition type in the main pricing procedure, we have to check the field “manual”, we shall specify the sub-total as ‘4’ and the account key is specified as ‘ERF’. So that the freight will be posted to that G/L account assigned to this account key ‘ERF’.
Setting-2: While maintaining the copying controls from delivery to billing document at the item level, we have to specify the value ‘F’ (shipment costs) for the field “price source”.
For In-depth knowledge on SAP SD click on:
You liked the article?
Like: 2
Vote for difficulty
Current difficulty (Avg): Medium

TekSlate is the best online training provider in delivering world-class IT skills to individuals and corporates from all parts of the globe. We are proven experts in accumulating every need of an IT skills upgrade aspirant and have delivered excellent services. We aim to bring you all the essentials to learn and master new technologies in the market with our articles, blogs, and videos. Build your career success with us, enhancing most in-demand skills in the market.

