The transformation is used to change one coordinate space to another co ordinate space, the transformation Microsoft designed using 3x3 matrix.
Transforms are used to apply the required effects to the 2D and 3D objects. Effects are like rotating, tilling the object, stretching as well as shrinking etc. using transforms we can give different effects to the controls
The transformation we can classify in to five types
using this transformation we can rotate an object using angle property.
using this transformation we can change x-co ordinate space and y-co ordinate space in the silverlight control, for changing co ordinate spaces we have to work with scale X, scaley properties.
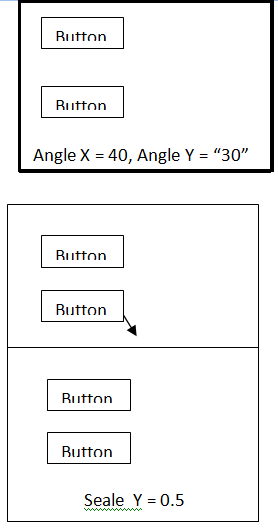
using this transformation we can skew an object co ordinate spaces using angles x, angle y properties.
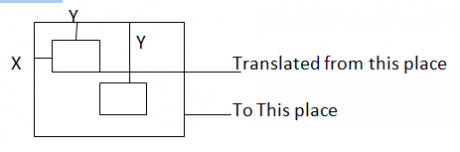
using this transformation we can set control X location and Y location for changing the locations the Microsoft given X and Y properties.
Open new silver light application
Go to XAML mode
In the canvas tag
<Canvas>
<Image X: name = “11” height = “100” width = “100” source = “ d:/face .jpg” canvas. Left = “100”>
<Image. Render transform>
<Rotate Transform Angle = “50”> </rotate Transform>
</Image. Render transform>
</Image>
<Image X:Name = “i2” Height = “100” width = “100” source = “d:/face.jpg” canvas. Left = “200”>
<image. Render transform >
<scale transform scale x = “5” scale y = “1” > </scale transform>
</image. Render transform>
</Image>
<image X:name = ”i3” height = “100” width = “100” source = “d : / face .jpg” canvas. Top = “170”>
<image. Render transform>
]<skew transform anglex = “10” angle Y = “20”> </skew transform>
</Image. Rendertansform>
</image>
</image x:Name = “i4” height = “100” width = “100” source = “d: /face .jap canvas. Left = “250” canvas. Top = “200” >
<image. Render transform>
<Translate transform X = “10” Y = “10”> </Translate Transform>
</image. Render transform>
</Image>
</canvas>
Image. Render Transform: This tag is used to create workspace for defining transformations.
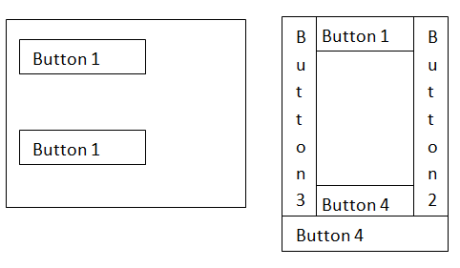
This transformation used to implement customized or programmer defined transformation, matrix transformation is combination of first four transformations.
This transformation the Microsoft designed using 3 x 3 matrix, depending on the requirement we can change any coordinate value
M11: using this property we can set first row, first column values from the 3x3 matrix
M12 : using this property we can change first row, second colum values.
M21: using this property we can change second row and first column values
M22: using this property we can change second row and second column values.
Offset X: using this property we can change third row and first column values
Offset Y: using this property we can change third row and second column values
Open new silver light application
Go to XAML Mode
In the canvas tag
<canvas>
<list box x: name = “l1” Height = “250” canvas.left = “50” canvas. Top = “100”>
<list box item>
<stack panel orientation = “horizontal’>
<text block text = “one”> </text block>
<Image source = “d:/one .jpg” Height = “40” > </imge>
</stack panel>
</list box item>
<listbox item>
<stack panel orientation = “horizontal”>
<Text block text = “Two”>
</text block>
<Image source = “d:/two.jpag” Height = “40”> </image>
</stack panel>
</list box item>
<list box item>
<stack panel orientation = “horizontal”>
<text block Text = “Three” > </Textblock>
<image source = “d:/three.jpg” height = “40”> </image>
</stack panel>
</list Box Item>
<list box item>
<stack panel orientation = “Horizontal”>
<Text block text = “three” > </Text block>
<Image source = “d:/three.jpg” height = “40” > </image>
</stack panel>
</list box item>
<listbox. Render transform>
<matrix transform>
<matrix transform. Matrix>
<matrix M11 = “1” M12 = “-.51” Mel = “.51”
M22 = “3” offset x = “10” offset y = “10”>
</matrix>
</matrix transform . matrix>
</matrix transform>
</list box. Render transform>
</list box>
</canvas>
This tag is used to create list box control, the list box control maintains list of items, depending on the selected item we can give the information.
This tag is used to add items in the list box control, each item we can give using silverlight controls, by default we can take one item, when we are taking multiple control features in the single item we have to work with stack panel layout.
Matrix Transform. Matrix : This tag gives workspace for defining matrix transformation.
Open new silverlight application
Go to XAML Mode
In the canvas tag
<canvas>
<Ellipse X:name = “e1” Height = “100” width = “150” stroke = “red” stroke thickness = “10” canvas. Left = “50” canvas. Top = “50” mouse Enter = “e1_mouseenter”>
</Ellipse. File>
<Ellipse. Render transform>
<skew transform angle x = “1” angley = “1” > </skew transfer>
</ellipse. Render transform>
<ellipse. Resource>
<storyboard x:name = “s1”>
<double animation storyboard. Target name = “e1” storyboard. Target property = “(UIElement. Render transform). Am from = “1” To = “70” auto reverse = “True” duration = “0:0:10”>
<\bouble animation >
<double animation storyboard. Target name = “e1” storyboard. Target property = “(UIElement. Render transform). And from = “1” to = “70” auto reverse = “true” duration = “0”0”10”>
</double animation>
</story board>
</ellipse. Resource>
</ellipse >
</canvas>
El_mouse enter
{
}
<Control class name attributes> <control class name Render Transform> <Transform class name property 1= “value” property 2=”value”/>|
</control class name.render Transform> </confrol class name>
This is used to rotate the object in clock wise or anti clock wise about a specified point in a two dimensional x,y coordinate system. When we use rotate transform the transformation rotates the coordinate system for a particular object about the origin point.
Every type of transform has a special class with same name of the transform.
This property is used to set or get the required angle in which the object should be rotated. If we give the angle as positive the rotation will be in clock wise. If the angle is negative the rotation will be in anticlockwise
Used to mention the origin or the angle to be rotated in both X and Y directions.
this is used to filt the object in required angle. Of X and Y coordinates. A skew Transform is useful for creating illusion of
Properties of skew Transform class
Used to set/get the required angle value that is to be filter form X-axis.
Used to set/get a value that is to be tilted from Y axis
This transform is user to stretch or shrink an object horizontally or vertically. This transformation is used to scale an object in the two dimensional x,y coordinate system
This property is used to set or get the value that is used to be shrink |stretch in X direction
used t set or get a value that indicates to shrink |stretch in Y direction
When we implement scale transform the object current state is assumed to ‘1’ the object will be stretched and if we are giving a value of less then ‘1’ the object will be shirked
This transform is used to move the current object in two dimensional x,y coordinate system
Properties:-
X Y
X:-Used to set 1 get the required value that the object should be moved in x-direction
Y:-Used to set 1 get a value that the object should be moved in Y direction.
This transform is used to apply two 0.2 more transforms at once to the object. In general using render transform we can apply only one transform at once there are no special properties for transform group, Rather it will contain other 4 transform classes as a group with in it.
From the other four transforms, we can implements two or more transforms together using this transform group class
<content=”Button”>
Create a button within the silver light application page go to .xaml source and write the following code <Button content+”Button” Height=”28” width=”60” content=”Button”
<button. Render transform> <Relate Transform AngleX=”45”/> </Button.Renter Transform>
<Grid x: name=layout Rool “Background = “while”> <button content= “Button” Height = “28” Width = “60” content= “Button1”>
<button render transform>
<Skew transform Angle x = “40” Angle Y= “30”/>
</Button. Render Transform>
</Button>
<button content = “Button” Height = “28”--- <Button. Render transform> <Scale Transform scale X = “2.5” Scale Y = “1.5”/>
</Button. Render Transform> </Button>
<button Content> <button.Render Transform> <Translation Transform X=”100” Y = “5”/> </Button.Render Transform> </Button> 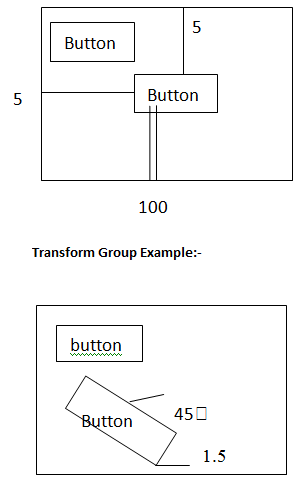
<button content = Button <Button. Render Transform> <Transform Group>
<Rotate Transform Angle = “45”/> <Scale Trans form scale X= “1.5”/>
</TransformGroup> </button.RenderTransform> </Button
You liked the article?
Like: 0
Vote for difficulty
Current difficulty (Avg): Medium

TekSlate is the best online training provider in delivering world-class IT skills to individuals and corporates from all parts of the globe. We are proven experts in accumulating every need of an IT skills upgrade aspirant and have delivered excellent services. We aim to bring you all the essentials to learn and master new technologies in the market with our articles, blogs, and videos. Build your career success with us, enhancing most in-demand skills in the market.

