Tables have two main styles: grouped and plain. Figure 10-3 illustrates a table with a plain style, while Figure 10-4 illustrates a table with a grouped style. Plain tables might also be indexed. An index sorts the rows and makes navigation quicker by letting a user jump to different locations in the index.
Grouping is accomplished by changing a UITableView’s style to grouped. You then tell a UITableView’s data source how many sections belong in the table and how many rows belong in each section. The class adopting the UITableViewDataSource protocol informs the table how many sections via the numberOfSectionsInTableView method. It informs the table how many rows are in each section via the tableView:numberOfRowsInSection: method.
Each grouping might have a title. You add titles by having your UITableViewDataSource protocol adoption implement the tableView:titleForHeaderInSection method. This method provides a table view with a title for a section’s header. You might also wish adding a footer to each grouping by implementing the tableView:titleForFooterInSection: method.
The fillList method initializes an NSArray of five NSArrays. The numberOfSectionsInTable View method simply returns five. Although not realistic, this number matches the number of data arrays (tempArrayA through tempArrayB). The tableView:titleForHeaderInSection is hard-coded to return A, B, C, D, or E, depending upon the current section. When the table loads, five sections are created, each with a title from the titleForHeaderInSection method. Each row’s content is determined from the cellForRowAtIndexPath method. 
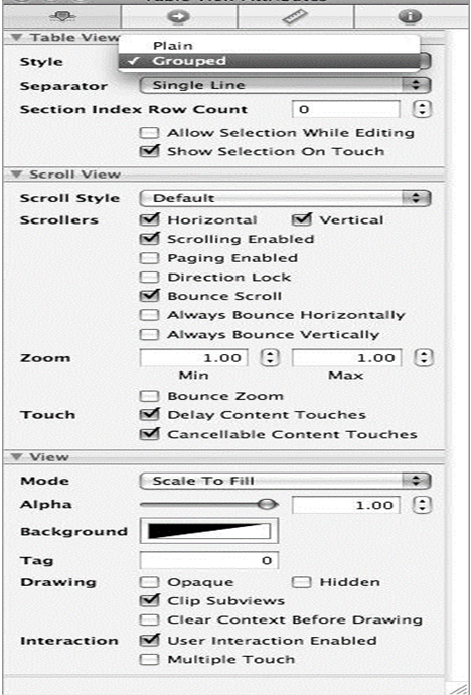 Figure 10-13 The application running in iPhone Simulator Listing 10-10 Table’s list modified to an array of arrays(void) fillList { NSArray * tempArrayA = [[[NSArray alloc] initWithObjects:@"AItem One", @"AItem Two", nil] autorelease]; NSArray * tempArrayB = [[[NSArray alloc] initWithObjects:@"BItem Three", @"BItem Four", nil] autorelease]; NSArray * tempArrayC = [[[NSArray alloc] initWithObjects:@"CItem Five", @"CItem Six", nil] autorelease]; NSArray * tempArrayD = [[[NSArray alloc] initWithObjects:@"DItem Seven", @"DItem Eight", nil] autorelease]; NSArray * tempArrayE = [[[NSArray alloc] initWithObjects:@"EItem Nine", @"EItem Ten", nil] autorelease]; NSArray * tempArray = [[[NSArray alloc] initWithObjects:tempArrayA, tempArrayB, tempArrayC, tempArrayD, tempArrayE, nil] autorelease]; self.tableDataList = tempArray; } Listing 10-11 Modifications to TableHandler.m to support grouping
}
switch (section) { case 0: return @"A"; break; case 1: return @"B"; break; case 2: return @"C"; break; case 3: return @"D"; break; case 4: return @"E"; break;} return nil; }(NSInteger) tableView : (UITableView *) tableView numberOfRowsInSection: (NSInteger) section { return 2; } Listing 10-12 The cellForRowAtIndexPath modified to use row and section(UITableViewCell *) tableView : (UITableView *) tableView cellForRowAtIndexPath: (NSIndexPath *) indexPath { UITableViewCell *cell = [tableView dequeueReusableCellWithIdentifier: @"acell"]; if(cell == nil) { cell = [[[UITableViewCell alloc] initWithStyle:UITableViewCellStyle Default reuseIdentifier: @"acell"] autorelease]; } cell.textLabel.text = [[self.tableDataList objectAtIndex:indexPath. section] objectAtIndex:indexPath.row]; return cell; }
Tables can be indexed. To index a table, a table’s style should be plain. As with grouping, you implement the numberOfSectionsInTableView: and tableView:numberOfRowsInSection: methods, but you also implement a third method: sectionIndexTitlesForTableView:. This method, implemented in your UITableViewDataSource adoptee, creates the titles that appear along a table’s right side. Upon clicking one of these values, a user is taken directly to the group with the corresponding title. - (NSArray *) sectionIndexTitlesForTableView:(UITableView *) tableView
Figure 10-14 A plain table with groupings

Listing 10-13 The sectionIndexTitlesForTableView method(NSArray *) sectionIndexTitlesForTableView: (UITableView *) tableView { NSArray * keys = [[[NSArray alloc] initWithObjects: @"A", @"B", @"C", @"D", @"E",nil] autorelease]; return keys; }
Figure 10-15 The indexed table running in iPhone Simulator
NOTE Don’t let this chapter’s reliance on simple NSArrays fool you into thinking you must use this collection class to hold a table’s data. You can use any collection class, or any other method you deem appropriate, provided you implement methods to obtain the data correctly.
Adding an image to a table, provided you are happy with the image appearing in the row’s upper-left corner, is not difficult. Simply add an image to the cell in the tableView: cellForRowAtIndexPath: method. Remember, this method loads a UITableViewCell into a row. You can use this method to initialize a table cell with an image using the UITableViewCell’s imageView.image property. The image is then displayed in the table’s row.
Listing 10-14 The tableView:cellForRowAtIndexPath: method added to TableHandler.m - (UITableViewCell *) tableView : (UITableView *) tableView cellForRowAtIndexPath: (NSIndexPath *) indexPath { UITableViewCell *cell = [tableView dequeueReusableCellWithIdentifier:@"acell"]; if(cell == nil) { cell = [[[UITableViewCell alloc] initWithStyle: UITableViewCellStyleDefault reuseIdentifier:@"acell"] autorelease]; } cell.textLabel.text = [[self.tableDataList objectAtIndex: indexPath. section] objectAtIndex: indexPath.row]; UIImage * image; switch (indexPath.section) { case 0: image = [UIImage imageNamed:@"power.png"]; break; case 1: image = [UIImage imageNamed:@"Icon.png"]; break; case 2: image = [UIImage imageNamed:@"package_graphics.png"]; break; case 3: image = [UIImage imageNamed:@"colorize.png"]; break; case 4: image = [UIImage imageNamed:@"web.png"]; break; } cell.imageView.image = image; return cell; }
Figure 10-16 Images are too large to display in the application’s table rows.
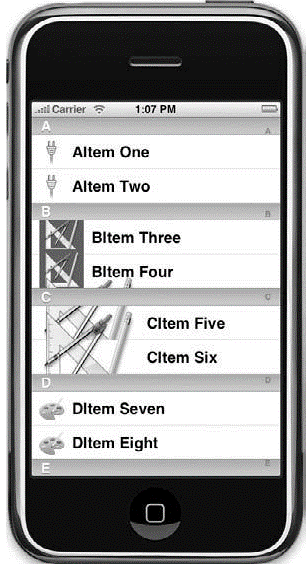
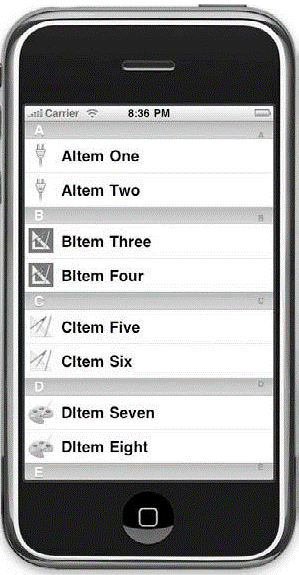
Figure 10-17 Resized images displayed correctly
The UITableView allows you to select a row. Typically, a table presents rows to a user, where each row is an item in a hierarchical list. Upon selecting a row, the user is generally taken to another view presenting the item’s details. You implement the tableView: willSelectRowAtIndex: and tableView:didSelectRowAtIndexPath: methods if you wish to allow a user to select a row. (NSIndexPath *) tableView:(UITableView *) tableView willSelectRowAtIndexPath: (NSIndexPath *) indexPath(void) tableView:(UITableView *) tableView didSelectRowAtIndexPath: (NSIndexPath *) indexPath The tableView:willSelectRowAtIndexPath: method allows the delegate to react to a row about to be selected. The tableView:didSelectRowAtIndexPath: method allows a reactionto a row’s selection. These methods are useful because they allow you to implement custom behavior in a table’s delegate when a row is selected.
Listing 10-15 The tableView:willSelectRowAtIndexPath: and tableView: didSelectRowAtIndexPath: methods -(NSIndexPath *) tableView: (UITableView *) tableView willSelectRowAt IndexPath: (NSIndexPath *) indexPath { NSLog(@"I selected the item at the %d array and %d item, the value is: %@", indexPath.section, indexPath.row, [[self.tableDataList objectAtIndex: indexPath.section] objectAtIndex: indexPath.row]); return indexPath; } -(void)tableView:(UITableView *) tableView didSelectRowAtIndexPath: (NSIndexPath *) index { NSLog(@"Yes I did...."); } Listing 10-16 Debugger Console logging [Session started at 2009-01-09 13:25:41 -0500.] 2009-01-09 13:25:45.453 TableProjectOne[2089:20b] I selected the item at the 0 array and 0 item, the value is: AItem One 2009-01-09 13:25:45.454 TableProjectOne[2089:20b] Yes I did.... 2009-01-09 13:25:48.372 TableProjectOne[2089:20b] I selected the item at the 1 array and 0 item, the value is: BItem Three 2009-01-09 13:25:48.373 TableProjectOne[2089:20b] Yes I did.... Changing Row Height A couple of sections ago, you added images that were too large to display in a table’s row. The correct way to fix this is usually to resize the images. However, sometimes you want to display a larger image, text with a large font, or a custom cell. One way you can add space in a table’s row is by increasing the row’s height. You increase a row’s height using the heightForRowAtIndexPath method. Changing Row Height
Figure 10-18 The application running with 90-pixel-high rows in iPhone Simulator

Listing 10-17 The heightForRowAtIndexPath method added to TableView
-(CGFloat) tableView : (UITableView *) tableView heightForRowAtIndexPath: (NSIndexPath *) indexPath { return 90; } Accessorizing Table Cells You can tell a cell to place a check mark, disclosure arrow, or detailed disclosure button in the cell by setting the cell’s accessoryView or accessoryType properties. Accessories are visual user interface clues for users. For instance, the check mark might inform a user that he or she has already selected a row. A disclosure arrow or a detailed disclosure button might hint to a user that he or she can select the row to view the row’s details in another view. The check mark and disclosure button are visual clues for a user and do not provide events that respond to a user tapping them. However, the detailed disclosure button can respond to a user tapping it.
Listing 10-18 The tableView:cellForRowAtIndexPath: and tableView:accessoryButton TappedForRowWithIndexPath: methods - (UITableViewCell *) tableView : (UITableView *) tableView cellForRowAtIndexPath: (NSIndexPath *) indexPath { NSUInteger section = [indexPath section]; UITableViewCell *cell = [tableView dequeueReusableCellWithIdentifier: @"acell"]; 
Figure 10-19 Accessorized table rows
if(cell == nil) { cell = [[[UITableViewCell alloc] initWithStyle: UITableViewCellStyleDefault reuseIdentifier:@"acell"] autorelease]; } cell.textLabel.text = [[self.tableDataList objectAtIndex:section] objectAtIndex:[indexPath row]]; UIImage * image; switch (indexPath.section) { case 0: image = [UIImage imageNamed:@"power.png"]; break; case 1: image = [UIImage imageNamed:@"Icon_resize.png"]; break; case 2: image = [UIImage imageNamed:@"package_graphics_resize.png"]; break; case 3: image = [UIImage imageNamed:@"colorize.png"]; break; case 4: image = [UIImage imageNamed:@"web.png"]; break; } cell.imageView.image = image; if(indexPath.section == 0) { cell.accessoryType = UITableViewCellAccessoryDisclosureIndicator; } else if(indexPath.section == 1) { cell.accessoryType = UITableViewCellAccessoryDetailDisclosureButton; } else { cell.accessoryType = UITableViewCellAccessoryCheckmark; } return cell; } -(void) tableView:(UITableView *) tableView accessoryButtonTappedForRowWithIndexPath: (NSIndexPath *) indexPath { NSLog(@"hey now...."); }
Tables can be customized. Sometimes you might wish to format data differently than provided by the default UITableViewCell. The most direct way to accomplish formatting a table cell is by adding a view to the UITableViewCell. You do this in code, by adding a subview to a cell when initializing it in the tableView:cellForRowAtIndexPath method. Another technique is to create a subclass of a UITableViewCell and then create its graphical layout using Interface Builder.
Figure 10-20 Setting the identifier to MyCell

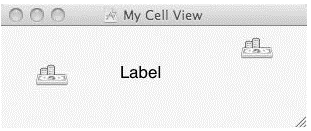
Figure 10-21 Adding UIImageView and UILabels to a view canvas
CAUTION If you do not set a cell’s identifier, the cell can never be reused. This means every call to tableView:cellForRowAtIndexPath: results in a new table cell.
Listing 10-19 MyCellView.h #import <UIKit/UIKit.h> @interface MyCellView : UITableViewCell { IBOutlet UILabel * theTextLabel; } @property (nonatomic, retain) IBOutlet UILabel * theTextLabel; @end Listing 10-20 MyCellView.m #import "MyCellView.h" @implementation MyCellView @synthesize theTextLabel; - (void)dealloc { [theTextLabel release]; [super dealloc]; } @end Listing 10-21 RootViewController.h #import <UIKit/UIKit.h> #import "MyCellView.h" @interface RootViewController : UITableViewController { } @end
Figure 10-22 Application with background color
 Listing 10-22 RootViewController.m #import "RootViewController.h" #import "CustomizedCellAppDelegate.h" @implementation RootViewController
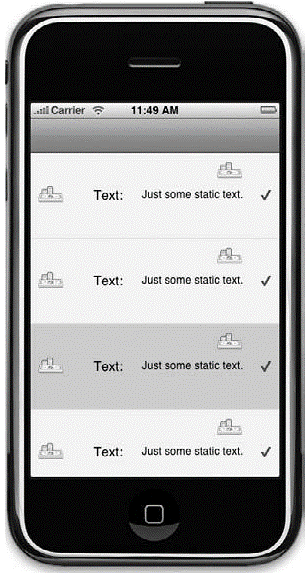
if(cell == nil) { cell = [[[NSBundle mainBundle] loadNibNamed:@"MyCellView" owner:self options:nil] objectAtIndex:0]; } [cell.theTextLabel setText:@"Just some static text."]; NSString *imagePath = [[NSBundle mainBundle] pathForResource:@"money" ofType:@"png"]; cell.imageView.image = [UIImage imageWithContentsOfFile:imagePath]; [cell setAccessoryType:UITableViewCellAccessoryCheckmark]; cell.contentView.backgroundColor = [UIColor yellowColor]; cell.backgroundView.backgroundColor = [UIColor yellowColor]; return cell; } - (void)dealloc { [super dealloc];}@end Notice in the previous example that you initialize the cell every time it’s called in the tableView:CellForRowAtIndexPath: method. This initialization is per Apple’s documentation, Table View Programming Guide for iPhone OS. The ―tableView:cellForRowAtIndexPath should always reset all content when reusing a cell.‖ That is why in the tableView: cellForRowAtIndexPath: you set the cell’s background color, image, and label text. In a more realistic example, you would probably vary a cell’s content depending upon the row. Implementing a UITableViewCell in its own nib does not require implementing a UITableViewCell class, as you did in the example. However, if you wish to override a UITableViewCell’s method, such as setSelected, you must implement your own custom class. You then set the UITableViewCell’s type in Interface Builder to be your custom subclass. In this example, that class is MyCellView. Implementing a custom UITableViewCell subclass is also a convenient location to place IBOutlets and IBActions for the controls on your custom UITableViewCell control. NOTE For more information on table-view cells, refer to the "A Closer Look at Table-View Cells" in Apple’s "Table View Programming Guide" for iPhone OS.
You liked the article?
Like: 0
Vote for difficulty
Current difficulty (Avg): Medium

TekSlate is the best online training provider in delivering world-class IT skills to individuals and corporates from all parts of the globe. We are proven experts in accumulating every need of an IT skills upgrade aspirant and have delivered excellent services. We aim to bring you all the essentials to learn and master new technologies in the market with our articles, blogs, and videos. Build your career success with us, enhancing most in-demand skills in the market.

