The Managed Metadata service application is a welcome addition to SharePoint 2010 and is one of my favorite Enterprise Content Management features within this release. In this three-part series, I plan to delve into the configuration of the Metadata Service Application and then finish off with real-life examples on utilizing our metadata throughout our SharePoint sites. So what is the Managed Metadata Service Application all about and what value does it bring over what we had in SharePoint 2007? The Managed Metadata’s primary purpose is to provide you with a central location to store metadata (commonly defined as data about data) that can be utilized throughout any site within your SharePoint farm. This is definitely one step ahead of what we referred to as Content Types and Site Columns in SharePoint 2007 where it was cumbersome to deploy to more than one site collection. The Managed Metadata Service Application requires Configuring the User Profile Service in SharePoint 2010 as this was a prerequisite for the User Profile Service Application.
Aspired to become a SharePoint? Explore the post to discover the know-how on the "SharePoint Training" course.
Managed Metadata and the word Taxonomy go hand in hand, and as mentioned previously, the Managed Metadata service application allows us to formalize our Taxonomy or metadata which will be utilized across the entire farm. There are a number of concepts that you will need to familiarize yourself with before we embark on the configuration.
Term Store This is the database in which our managed metadata is stored in.
Term is a word or a phrase that can be associated with an item in SharePoint Server 2010.
Term set is a collection of related terms. There are two types of Terms available within SharePoint 2010. These are “Managed Terms” and “Enterprise Keywords”.
“Managed terms, commonly referred to as “Taxonomy” are predefined words or phrases that can only be created by users with the appropriate permissions. We can refer to this special group of users as “Metadata Content Managers”.
“Enterprise keywords commonly referred to as “Folksonomy” are words or phrases that have been added by the end-user.
Now that we have a better understanding of some of the key concepts, let’s deep dive into our setup and configuration of the Managed Metadata Service Application.
Setup the Managed Metadata Service
To set up our Managed Metadata Service, navigate to Central Administration / Application Management / Manage Service Applications.
Click New and select “Managed Metadata Service”
Enter the follow details;
Name Managed Metadata Service Database Server: <server_name> Database Name: Managed Metadata DB I will utilize the sp_farm account for the Application Pool Identity. 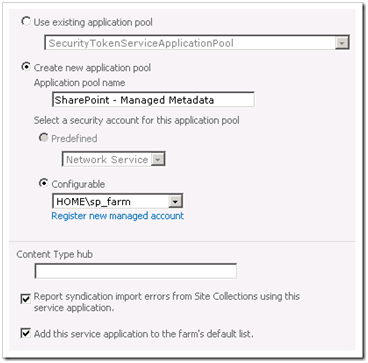
Click Create. Lastly, navigate to Central Administration / System Settings / Manage services on the server and start the Managed Metadata Web Service. 
Now that we have successfully set up our Managed Metadata Service, let’s venture into the Term Store Management Tool. You can do so by navigating to Central Administration / Manage Service Applications and clicking on the newly created Managed Metadata Service. Note, you can achieve the same by highlighting the service application and clicking on the Manage icon located in the ribbon. This will launch the below screen which is referred to as the Term Store Management Tool.
Let’s quickly highlight what is made available on this screen.

Available Service Applications: If the farm has been set up with multiple Managed Metadata service applications you can easily navigate and configure each one from the single interface.
Sample Import: Here, Microsoft is providing your designated Metadata Managers with a template import file. This template can be used as a base of creating your own which can then be later imported. Term Store Administrators: This is where you would add the designated users which will provide them with the ability to create new term set groups. By doing so, they will in turn be able to provide the necessary permissions to the group manager role. Note, users added here have full control of the specified term store. In the above screen capture, I have gone ahead and added Administrator and myself as Term Store Administrators.
Default Language: This one is self-explanatory
Working Languages: In addition to the Default Language, you can also specify additional languages available for translation purposes. That’s it for now. Stay tuned for my next article in which I will venture into creating Groups, Term Sets, and Terms and demonstrate how we can utilize our managed metadata within our SharePoint sites.
References Plan managed metadata (SharePoint Server 2010) http://technet.microsoft.com/en-us/library/ee530389.aspx Navigate to Central Administration / Application Management / Manage Service Applications. Highlight the Managed Metadata Service and click on Manage. This launches the Term Store Management Tool which we briefly introduced in
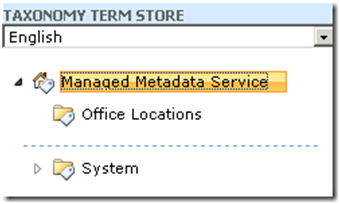
Part 1 of this series. Let’s begin by creating a new group. You can do so by clicking on the Management Metadata Service node (or whatever you called it) and selecting New Group. 
In my example, I will create a group labeled “Office Locations”. I have entered a description to help others identify the purpose of this group and added the Group Managers and Contributors, so what’s difference between the two levels of permissions?

Group Managers have the privilege to add items to the group and also have the ability to add users to the Contributors group. Contributors have the privilege to only add and edit terms and set term hierarchies within the group. After adding the above details, click on Save. Our new Group will now be listed as per the below.
I will now create 2 Term Sets which will sit under “Office Locations”. They will be, “State” and “City”. You can do so by clicking on the Group Name and selecting New Term Set. 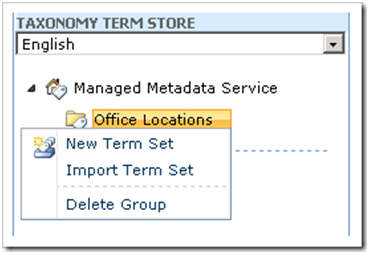
I will label my first Term Set as “State”. Here I will identify the owner of this Term set, optionally specify an email address for “term suggestion” and list the Stakeholders who are notified before major changes are made to the term set. We can also set the Submission Policy which dictates whether we allow users to contribute to the Term Set (commonly referred to folksonomy) or restrict it to only metadata managers (Taxonomy). Our last option determines whether we will allow our end-users to utilize the term set for tagging.

Once you have specified your options, click Save. I will now proceed to create a second Term Set labeled City as per the above instructions. Once finalized, our Term Sets will be listed under our Group as per the below screen capture.

I will now proceed to create our Terms below our Term Sets. I’ll begin by selecting the first Term Set “State” and then selecting Create Term.

I will create my first Term, “NSW” which is an Australian State. You will then be greeted with the below screen;

Here we can specify whether the Term is available for Tagging, add a Description to assist users and add “Other Labels” in which we can enter synonyms and abbreviations relating to the Term. This might come in handy when adding Terms and in my example, I have added “New South Wales” as an additional Label to the abbreviated “NSW” Term. Click Save once you have completed the modifications. I will proceed to create a Term for each State and City following the above steps and you should have something similar to the below once you have finished.

Note, we can expedite the creation of Term Sets by using the Import method
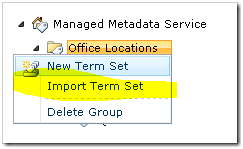
As an example, I have utilized the sample Import File provided by Microsoft and imported the contents within our Managed Metadata Service.

Now that we have a thorough understanding of the creation of Groups, Term Sets, and Terms we will continue our journey in the next and final part of this series where we will utilize our Metadata within our SharePoint Sites.
Let’s navigate to a List in which we would like to add our Managed Metadata as a column. Navigate to the List or Library in question and click on List under List Tools in the Ribbon and then click on Create Column.

Enter a name for your Column. In my example, I will call it State as I will be using the State Term Set which we created in earlier and select Managed Metadata as your column type. Set your “Display format” so it either displays just the term label or the entire path. Under Term Set Settings, select your Term Set. You can also utilize the search facility in the event you have a large number of Term Sets. 
Finally select whether you want to Allow Fill-in, which is only available if your Term Set was set to allow it. This is handled by the Submission Policy set to Open, (discussed earlier). 
Click OK once done. I will now proceed to add a new item in my fairly bland Custom List via Add new item.
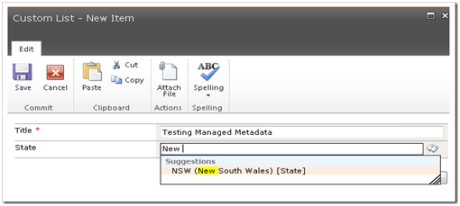
You have the option to click on the browse button on the right or you can begin typing in which it will provide you with Suggestions. In the above screen capture I began typing in one of the “other labels” or commonly referred to as synonyms the end result will be the actual “Default Label” Term listed in the Taxonomy Term Store in Central Administration. E.G. I was typing in “New South Wales” and the default label in the Term Store was set to “NSW”.

One thing to note is the “Send Feedback” link, which is visible if you click on the browse button beside your metadata field. This allows users to provide feedback if an email address was specified under “Contact” in the properties of the Term via the Term Store Management Tool.

There are a couple of neat navigation enhancements made available out of the box in SharePoint 2010 which tightly integrates with our Metadata. Commonly referred to as Metadata Navigation, these options are listed under our List Settings. Navigate to List Settings / General Settings / Metadata navigation settings. Within this screen, we can specify which fields we want to utilize and incorporate in our Navigation Hierarchies and or Key Filters which are both displayed below the Quick Launch. Both allow for enhanced and easy drill-down when filtering your list. I have gone ahead and added our “State” Metadata field to both Navigation Hierarchies and Key Filters as examples.

Example of a Navigation Hierarchy.

Example of Key Filters.

You liked the article?
Like: 0
Vote for difficulty
Current difficulty (Avg): Medium

TekSlate is the best online training provider in delivering world-class IT skills to individuals and corporates from all parts of the globe. We are proven experts in accumulating every need of an IT skills upgrade aspirant and have delivered excellent services. We aim to bring you all the essentials to learn and master new technologies in the market with our articles, blogs, and videos. Build your career success with us, enhancing most in-demand skills in the market.

