While processing, many times an application must inform users that they must wait. A poorly constructed application provides no graphical clue that the application is busy processing; a well-constructed application does provide a graphical clue. The iPhone SDK provides the UIActivityIndicatorView and UIProgressView classes to tell a user to ―please wait, I’m processing.‖ The UIActivityIndicatorView uses a spinning ―gear‖ to tell a user an application is processing and that it will eventually complete. The UIProgressView control also tells a user to ―please wait,‖ but it provides a visual clue as to how much processing remains. The two controls’ names highlight their difference: The activity indicator shows activity, while the progress view shows progress. A user-friendly application also informs a user when something unexpected occurs,and it informs a user when his or her decision might be potentially damaging. Moreover,the application informs the user in a way that highlights the importance of the problem. Sometimes unexpected events occur or a user makes a potentially destructive decision. For these situations an application presents an alert dialog. Alerts provide information in a box separate from the underlying interface. This separation reinforces the alert’s message that the situation is important and unusual, separate from an application’s typical functionality. Alerts are also modal, meaning a user can do nothing else until clicking one of the alert’s buttons to release it. Action sheets are similar to alerts, but provide alternatives to actions and slide in from an application’s top (desktop OS X applications) or from an application’s bottom (iPhone applications). You use action sheets for similar situations to an alert, but action sheets are more appropriate for actions more integrated with an application.
A UIActivityIndicatorView class creates an animated indeterminate progress indicator. This control tells the user to "please wait, I’m processing". The control does not tell the user how long he or she must wait. Apple’s reference for this class, which refers to the visual element 
Figure 11-1 An activity indicator on Amazon.com’s application
as an animated "gear," illustrates an activity indicator in use (Figure 11-1). When I start the Amazon.com application, it fetches my content from its web server. Fetching this content takes time— how much time, the application doesn’t know—and so the application uses a UIActivityIndicatorView.Using a UIActivityIndicatorView in an application is easy. Begin the indicator’s animation by calling its startAnimating method, and stop the indicator’s animation by calling the stopAnimating method. If you wish to hide the indicator when not animated, set the property hidesWhenStopped to YES. You can also specify the activity indicator’s size and style using its activityIndicatorViewStyle property. The indicator types are large white (UIActivityIndicatorV iewStyleWhiteLarge), white (UIActivityIndicatorViewStyleWhite), and gray (UIActivityView StyleGray). Figure 11-2 illustrates setting this property in Interface Builder. Figure 11-3 shows the three styles in iPhone Simulator. 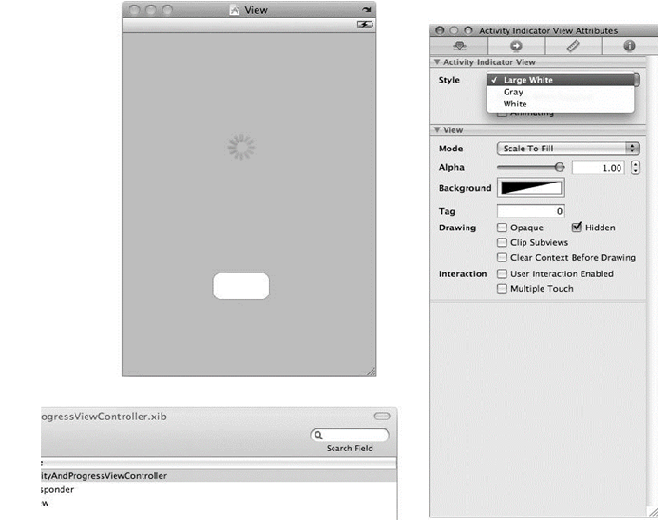

Figure 11-3 Three different UIActivityIndicatorView styles
Using a UIActivityIndicatorView
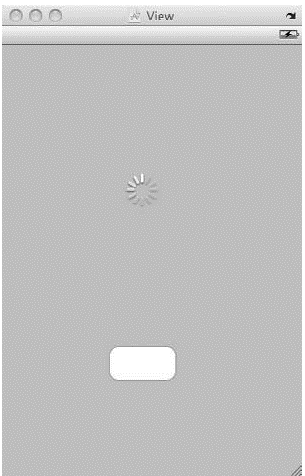
Figure 11-4 Adding a button and activity indicator to a view’s canvas
Listing 11-1 ActivityAndProgressViewController.h #import <UIKit/UIKit.h> @interface ActivityAndProgressViewController : UIViewController { IBOutlet UIActivityIndicatorView * myActivityView; } @property (nonatomic, retain) IBOutlet UIActivityIndicatorView * myActivityView; - (IBAction) doIt: (id) sender; @end Listing 11-2 ActivityAndProgressViewController.m #import "ActivityAndProgressViewController.h" @implementation ActivityAndProgressViewController @synthesize myActivityView; - (IBAction) doIt: (id) sender { if( [myActivityView isAnimating]) [myActivityView stopAnimating]; else [myActivityView startAnimating]; } - (void)dealloc { [myActivityView release]; [super dealloc]; }@end
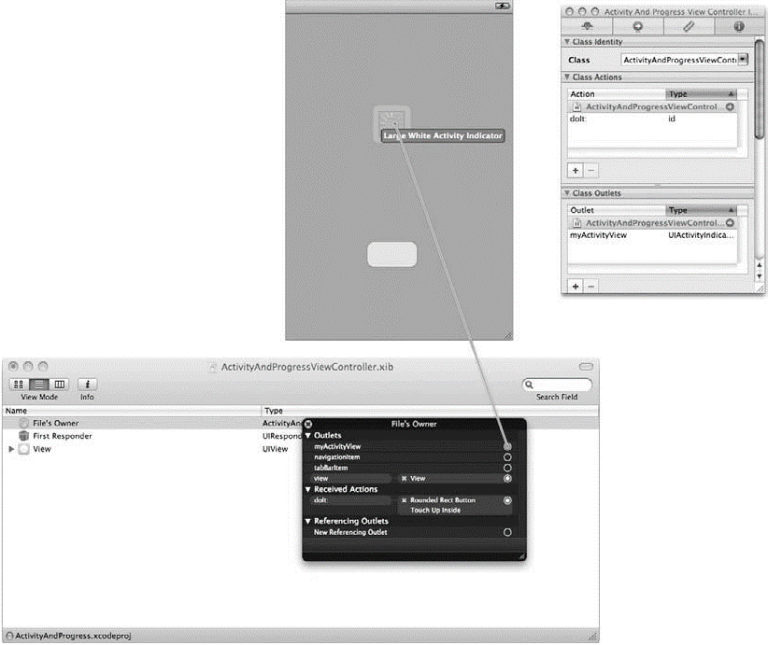 Figure 11-5 Connecting the myActivityView outlet to the activity indicator

Figure 11-6 Ensuring the indicator’s Hide When Stopped and Hidden check boxes are checked
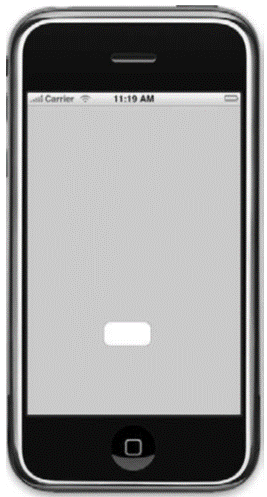

Figure 11-7 The application running in iPhone Simulator
When the application loads, it hides the activity indicator, as it is not animating. When you first click the button, the application displays the activity indicator and begins animating it. The next time you click the button, the application stops animating the indicator and hides it. Showing Progress-the UIProgressView A progress bar shows a task’s progress. It is intended as a ―please wait, I’m processing and I have this much processing remaining‖ for tasks with a known duration. For instance, an application might process a file’s content, and as the file is processing, the application calculates the percentage remaining and displays it using a progress bar. As the file’s content is processed, the progress bar updates its display to reflect the new percentage remaining until completion.Creating a progress bar is more involved than an activity indicator. However, it is still not difficult. Before beginning the task, note that a common technique in many books and online tutorials is to set a progress view in an alert. Although easy, as of this book’s writing, Apple neither supports nor recommends this technique. The recommended way of displaying a UIProgressView is by creating a new view with a transparent background and showing the progress bar in the new view. Because the view overlays the content view, the progress bar is modal. That is the strategy taken here.

Figure 11-8 PleaseWaitViewController’s view in Interface Builder
 Figure 11-9 ActivityAndProgressViewController’s canvas
Listing 11-3 PleaseWaitViewController.h #import <UIKit/UIKit.h> @interface PleaseWaitViewController : UIViewController { IBOutlet UIProgressView * myProgress; } @property (nonatomic, retain) IBOutlet UIProgressView * myProgress; @end 
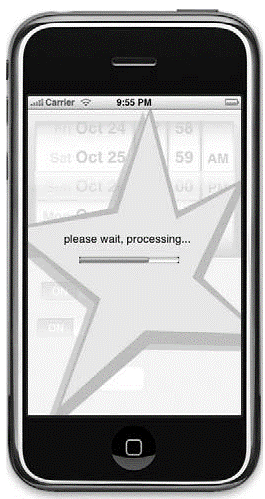 Figure 11-10 The application running in iPhone Simulator. Figure 11-11 The application displaying the UIProgressView you added to the project. Listing 11-4 PleaseWaitViewController.m #import "PleaseWaitViewController.h" @implementation PleaseWaitViewController @synthesize myProgress; - (void)dealloc { [myProgress release]; [super dealloc]; } @end Listing 11-5 ActivityAndProgressViewController.h modified for this task #import <UIKit/UIKit.h> #import "PleaseWaitViewController.h" #import "ActivityAndProgressAppDelegate.h" @interface ActivityAndProgressViewController : UIViewController { IBOutlet PleaseWaitViewController * myActivityView; } @property (nonatomic, retain) IBOutlet PleaseWaitViewController * myActivityView;
@end Listing 11-6 ActivityAndProgressViewController.m modified for this task #import "ActivityAndProgressViewController.h" @implementation ActivityAndProgressViewController @synthesize myActivityView; int completed = 0; - (void) moveBar: (id) object { completed ++; myActivityView.myProgress.progress = completed/20.0f; if(completed > 20) { [object invalidate]; [self.myActivityView.view removeFromSuperview]; [self.view setAlpha:1.0f]; completed = 0; self.myActivityView.myProgress.progress = 0; } } - (IBAction) doIt: (id) sender { myActivityView.view.backgroundColor = [UIColor clearColor]; [self.view setAlpha:0.7f]; [((ActivityAndProgressAppDelegate *)[UIApplication sharedApplication].delegate).window insertSubview:myActivityView.view aboveSubview: self.view]; [NSTimer scheduledTimerWithTimeInterval: 0.5 target: self selector: @selector(moveBar:) userInfo: nil repeats: YES]; } - (void)dealloc { [myActivityView release]; [super dealloc]; } @end This task is pretty cool. You first created a separate view controller and view to contain the UIProgressView. Not happy with just a normal view, you added an image and placed the controls over the image. Later, when setting the view’s background color to clear, this created the impression of a non-rectangular view (see Figure 11-8). Q: So you create a non-rectangular view by using a UIImageView on a clear view? A: Yes, this is one technique. A more robust technique is drawing the user interface yourself, but drawing a user interface from scratch is hard. Using a UIImageView on a view with a clear background is easy. Make your application’s window clear, the views clear, and then place any controls so that they overlay the image. For instance, Figure 11-12 illustrates a simple non-rectangular view.You also added a UIProgressView to the PleaseWaitViewController (Listing 11-3) as an outlet. You then added a PleaseWaitViewController (Listing 11-5) as an outlet. This allows you to reference both the PleaseWaitViewController and its UIProgressView from code in Activity AndProgressViewController.In ActivityAndProgressViewController, you created a method called moveBar and modified the doIt method. The doIt method is called when a user clicks the button on the ActivityAndProgressViewController. The method first sets its myActivity view’s background color to clear, making the view transparent. myActivityView.view.backgroundColor = [UIColor clearColor];
Figure 11-12 A simple non-rectangular view
The method then sets the view’s alpha level, giving it a faded, semi-transparent appearance. [self.view setAlpha:0.7f]; The doIt method also then gets a reference to the application’s window and adds myActivity’s view above the ActivityAndProgressViewController’s view. [((ActivityAndProgressAppDelegate *)[UIApplication sharedApplication] .delegate).window insertSubview: myActivityView.view aboveSubview: self.view]; To simulate a long-standing task, you use an NSTimer, which every half a second calls ActivityAndProgressViewController’s moveBar method. [NSTimer scheduledTimerWithTimeInterval: 0.5 target: self selector: @selector(moveBar:) userInfo: nil repeats: YES]; The moveBar method updates the progress bar until it reaches 20. It then invalidates the timer, removes PleaseWaitViewController’s view, and sets the original view’s alpha back to full strength. It also reinitializes the UIProgressView’s progress value to zero. [NSTimer scheduledTimerWithTimeInterval: 0.5 target: self selector: @selector(moveBar:) userInfo: nil repeats: YES];
You liked the article?
Like: 0
Vote for difficulty
Current difficulty (Avg): Medium

TekSlate is the best online training provider in delivering world-class IT skills to individuals and corporates from all parts of the globe. We are proven experts in accumulating every need of an IT skills upgrade aspirant and have delivered excellent services. We aim to bring you all the essentials to learn and master new technologies in the market with our articles, blogs, and videos. Build your career success with us, enhancing most in-demand skills in the market.

