Virtual Host Configuration in WLS
Overview: Virtual hosting, which defines a set of host names to which WebLogic Server instances (servers) or clusters respond. When you use virtual hosting, you use DNS to specify one or more host names that map to the IP address of a server or cluster. When you deploy the application on virtual host, it means you hide the IP address of the servers which are actually going to serve the requests. It can either be targeted to one individual server or the whole cluster. Example, we have configured a virtual host for the admin server. Below are the steps we need to follow: 1) The first requirement for creating a virtual host is to create a network channel on the admin server. - Go to the admin console, click on servers -> admin server - Go to the Protocols -> Channel tab - Give the name of the channel as port-81, choose the protocol as http. - Give listen address as localhost, give the listen port as 81. Leave the external listen address and port bank. - Enable HTTP tunneling as per your preference. - Leave the security part as it is to the default unchecked values. - You will see the below configuration once the channel is created.  - Restart the server to confirm that the server is using the default channel and port-81 channel. 2) Once the network channel is created, go to Environment -> Virtual hosts - Click on new, give a name to the host vh.localhost.org. - Now click on the virtual host vh.localhost.org, give the below values: Virtual Host Names: vh.localhost.org Network Access Point Name: port-81
 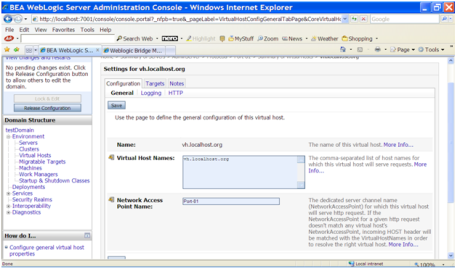 Click on targets tab, check the admin server. Save the changes and restart the server. 3) Now we need to modify the windows host file in C:\WINDOWS\system32\drivers\etc directory and add the host name vh.localhost.org which we have specified for the virtual host. Add the below in the file: 127.0.0.1 vh.localhost.org 4) Now deploy one test application following the below steps: - Click on deployments - Click on install -> Choose the application from the path - Click next, check Install this deployment as an application -> target it to the virtual host (not the server)
 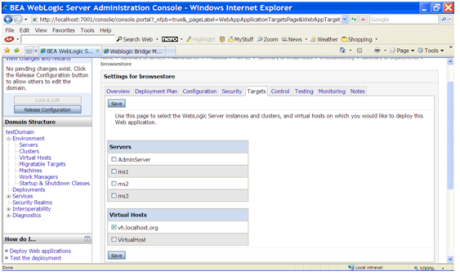 Click finish and Deployment state should be active. Now access the application using the url: http://vh.localhost.org:81/web-app You should see the welcome page of the application. Check out our Related Courses Weblogic Tutorials Introduction to Clustering Weblogic Weblogic Server Admin Training in Hyderabad Oracle Weblogic Server Installation
You liked the article?
Like : 0
Vote for difficulty
Current difficulty (Avg): Medium
About Author

Name
TekSlate is the best online training provider in delivering world-class IT skills to individuals and corporates from all parts of the globe. We are proven experts in accumulating every need of an IT skills upgrade aspirant and have delivered excellent services. We aim to bring you all the essentials to learn and master new technologies in the market with our articles, blogs, and videos. Build your career success with us, enhancing most in-demand skills in the market.
Stay Updated
Get stories of change makers and innovators from the startup ecosystem in your inbox