UITable View
Tables Using UITableView and UITableViewController
Key Skills & Concepts
- Understanding table views
- Understanding table view delegates
- Understanding table view data sources
- Grouping and indexing table rows
- Selecting table rows
- Modifying a table’s appearance
- Using a table in a navigation controller
- Editing a table’s rows
TableViews display content in a list. Tables have a single column and multiple rows. They can scroll vertically and display large data sets. For example, the Notes application is a good example of an application containing a table. Note’s first screen is a list comprised of zero or more notes. In Figure 10-1, the list contains three notes. Each row presents the note’s text, transcription time, and a disclosure arrow.
Figure 10-1 The Notes application consists of a UITableView and UINavigationBar.


Figure 10-2 Creating a new note using the Notes application
The disclosure arrow indicates that details are on the next screen. Upon tapping a row, the application takes the user to the detail view for that particular row’s note (Figure 10-2). Tables can be grouped and indexed. For instance, the Music application on an iPod touch uses an index (Figure 10-3). The Settings application’s rows are grouped (Figure 10-4). Table rows might also contain a picture and other customizations, as the YouTube and App Store applications illustrate (Figure 10-5). As the applications in the first five figures illustrate, the table view is a powerful control for listing items. You can modify rows, add images, select rows, and edit them. In this chapter, you learn how to use tables. You learn how to build a table, change its style to grouped, add an index to it, and accessorize it. You also learn how to place a table in a navigation controller and how to edit a table’s rows. It is a long chapter, but the table view is a powerful control.
UITableView
The UITableView class represents a table view. This class is for displaying and editing information lists. It consists of a single column of multiple rows. Users can scroll vertically to navigate through a table’s rows. Each row contains a cell. You can customize that cell’s appearance considerably. You can index tables and create tables with zero or more sections. When you create a table, you have a choice of two styles: UITableViewStylePlain or UITableViewStyleGrouped. A plain table style presents a table like that in Figure 10-3. A grouped table presents a table like that in Figure 10-4. You see examples implementing both styles later in this chapter. 
Figure 10-3 The Music application on an ipod Figure 10-4 The Settings application uses a grouped UITableView touch uses a UITableView with an index.
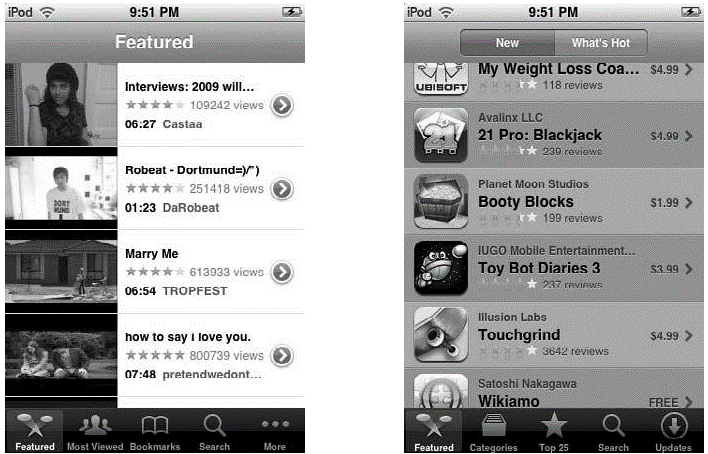
Figure 10-5 The YouTube and App Store applications use images and custom cells.
UITableView classes have an associated UITableViewController, a UITableViewDelegate, and a UITableViewDataSource. The UITableViewController is the controller class for a table view. You create an instance of this class to manage the UITableView. The UITableViewDelegate is a protocol you adopt in a custom class you write. This protocol allows you to manage selections, configure headers and footers, and manage cells. The UITableViewDataSource is also a protocol you adopt in a custom class. This protocol allows you to manage a table’s data source.
Adopting the UITableViewDelegate and UITableViewDataSource
In this first task, you create a UIViewController and have it manage the table view. You also implement a custom class that adopts the UITableViewDelegate and UITableViewDataSource. Creating an Empty Table
- Create a new Window-based Name the application TableProjectOne.
- Create a new UIViewController Name the class MyViewController.
- Create a new empty xib named
- Open xib.
- Add a view to the document window and add a table view to the view (Figure 10-6). Be certain to resize the table view to completely fill the
- Change the File’s Owner to Connect the File’s Owner view to the view in the document window.
- Save and exit Interface
- Add a MyViewController as an IBOutlet to TableProjectOneAppDelegate (Listings 10-1 and 10-2).
- Modify applicationDidFinishLaunching so it adds the viewController property’s Build the application.
- Open xib and drag a View Controller to the document window. Change its class and Nib Name to MyViewController.
- Connect the TableProjectOneAppDelegate’s viewController outlet to the MyViewController added to the document
- Save and exit Interface
- Build and run the The application loads an empty table into the iPhone
 Figure 10-6 Adding a UITableView to an Interface Builder project NOTE In steps 1–13, you added the table view as a subview to the view in the MyViewController Nib. If you preferred, you could omit the extra view and just add the table view directly as the nib’s view. But note, you would also change MyViewController from a UIViewController, to a UITableViewController. Point is, you don’t have to put the UITableView inside a UIView in order to use it. A UITableView can be added directly to the XIB and connected to a table view controller’s view outlet, and it will work the same way. The next Try This example illustrates.
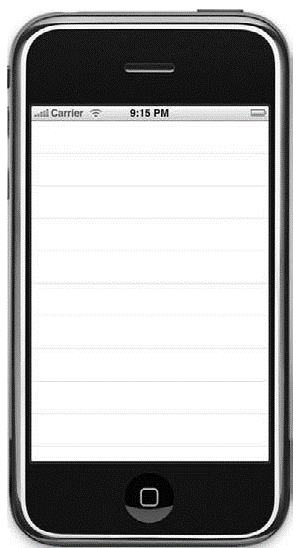
Figure 10-7 An application with an empty UITableView
Listing 10-1 TableProjectOneAppDelegate.h #import <UIKit/UIKit.h> #import "MyViewController.h" @interface TableProjectOneAppDelegate : NSObject <UIApplicationDelegate> { UIWindow *window; IBOutlet MyViewController * viewController; } @property (nonatomic, retain) IBOutlet MyViewController * viewController; @property (nonatomic, retain) IBOutlet UIWindow *window; @end Listing 10-2 TableProjectOneAppDelegate.m #import "TableProjectOneAppDelegate.h" @implementation TableProjectOneAppDelegate @synthesize window; @synthesize viewController;(void)applicationDidFinishLaunching:(UIApplication *)application { [window addSubview:self.viewController.view]; [window makeKeyAndVisible]; }(void)dealloc { [window release]; [viewController release]; [super dealloc]; } @end In this task’s first step, you created a UITableView as a subview of a UIView. When the UIViewController loads and displays its view, the view automatically displays its subview, the table view. But all it loads is an empty table. To actually load data into the table, you must implement a delegate and a data source. Moreover, the data source must actually provide data for the table. In the next few steps, you create a delegate and data source for the table. Adding a Delegate and Data Source
- Create a new NSObject named Change TableHandler so it adopts the UITableViewDelegate and UITableViewDataSource protocols (Listings 10-3 and 10-4).
- Add an NSArray property and a method named fillList for filling the
- Implement the fillArray method so the application has data to load into the table’s
- Implement the tableView:numberOfRowsInSection: and tableView: cellForRowAtIndexPath:
- Modify MyViewController to have a TableHandler property (Listings 10-5 and 10-6). Ensure the property is an
- Implement the viewDidLoad method in MyViewController so that it calls its TableHandler’s fillList
- Save and
- Open xib and drag an object to the document window. Change the object’s class to TableHandler (Figure 10-8).
- Connect the File’s Owner myHandler outlet to the newly added TableHandler (Figure 10-9).
 Figure 10-8 Adding a TableHandler reference to Interface Builder
- Connect the table view’s dataSource and delegate outlets to the newly added table handler.
- Save and exit Interface
- Click Build And The application displays 20 rows (Figure 10-10).
 Figure 10-9 Connecting the controller to TableHandler
Figure 10-10 The project running in iPhone Simulator
Listing 10-3 TableHandler.h #import <Foundation/Foundation.h> @interface TableHandler : NSObject <UITableViewDelegate, UITableViewDataSource> { NSArray * tableDataList; } @property (nonatomic, retain) NSArray * tableDataList; - (void) fillList; @end Listing 10-4 TableHandler.m #import "TableHandler.h" @implementation TableHandler @synthesize tableDataList; - (void) fillList { NSArray * tempArray = [[[NSArray alloc] initWithObjects:@"Item One", @"Item Two", @"Item Three", @"Item Four", @"Item Five", @"Item Six", @"Item Seven", @"Item Eight", @"Item Nine", @"Item Ten", @"Item Eleven", @"Item Twelve", @"Item Thirteen", @"Item Fourteen", @"Item Fifteen", @"Item Sixteen", @"Item Seventeen", @"Item Eighteen", @"Item Nineteen", @"Item Twenty", nil] autorelease]; self.tableDataList = tempArray; } -(NSInteger) tableView : (UITableView *) tableView numberOfRowsInSection: (NSInteger) section { return [self.tableDataList count]; } -(UITableViewCell *) tableView : (UITableView *) tableView cellForRowAtIndexPath: (NSIndexPath *) indexPath { UITableViewCell *cell = [tableView dequeueReusableCellWithIdentifier:@"acell"]; if(cell == nil) { cell = [[[UITableViewCell alloc] initWithStyle:UITableViewCellStyle Default reuseIdentifier:@"acell"] autorelease]; } cell.textLabel.text = [self.tableDataList objectAtIndex:[indexPath row]]; return cell; } - (void)dealloc { [tableDataList release]; [super dealloc]; } @end Listing 10-5 MyViewController.h #import <UIKit/UIKit.h> #import "TableHandler.h" @interface MyViewController : UIViewController { IBOutlet TableHandler * myHandler; } @property (nonatomic, retain) IBOutlet TableHandler * myHandler; @end Listing 10-6 TableProjectOneAppDelegate.m #import "MyViewController.h" @implementation MyViewController @synthesize myHandler;(void) viewDidLoad { [self.myHandler fillList]; }(void)dealloc { [self.myHandler release]; [super dealloc]; } @end
UITableViewController
The UITableViewController manages a table view. The UITableView can use objects defined in a table’s nib to define a table’s delegate and data source, or it can use itself as the delegate and data source. For instance, in the previous example, you set the table’s delegate and data source properties to the TableHandler class. You could have added a UITableViewController, set it as the table’s File’s Owner, and then set its outlets to TableHandler. If you do not provide a delegate and data source in a table’s nib, a UITableViewController sets its data source and delegate to itself. By doing this, the UITableViewController saves you the work of having to create your own classes so they adopt the delegate and data source. You still must implement any data source and delegate methods desired. However, rather than implementing these methods in separate custom classes, you implement them in a UITableViewController subclass. The UITableViewController then functions as the table’s controller, delegate, and data source.
Using a UITableViewController
In the last Try This task, you did things the hard way. However, the task’s purpose was to illustrate adding a table view as a subview, with no controller. In this Try This task, you use a UITableViewController. Moreover, rather than adding a table view as a subview, you add it directly to the xib as the primary view.
- Create a new Window-based Name the application TableProjectTwo.
- Create a new UITableViewController Name the class MyTableViewController (Listings 10-9 and 10-10).
- Create a new empty xib named
- Open xib.
- Add a table view to the document window (Figure 10-11).
- Change the File’s Owner to MyTableViewController if it is not already. Connect the File’s Owner view to the table view in the document window.
 Figure 10-11 Adding a UITableView to an Interface Builder project
- Connect the newly added table view’s dataSource and delegate outlets to the File’s
- Save and exit Interface
- Add a MyTableViewController as an IBOutlet to TableProjectTwoAppDelegate (Listings 10-7 and 10-8). Do not forget to import
- Modify applicationDidFinishLaunching so it adds the viewController property’s Build the application.
- Open xib and drag a Table View Controller to the document window. Change its class and Nib Name to MyTableViewController.
- Connect the TableProjectTwoAppDelegate’s viewController outlet to the MyTableViewController added to the document
- Save and exit Interface builder.
- Implement the table delegate and datasource methods the same as you did in TableHandler in this chapter’s first Try This task.
- Modify MyTableViewController so that it has an NSArray called tableDataList and have it populated in the viewDidLoad
- Build and run the application. The application loads an empty table into the iPhone Simulator. The results should match the previous task’s results (Figure 10-10).
Listing 10-7 TableProjectTwoAppDelegate. #import <UIKit/UIKit.h> #import "MyTableViewController.h" @interface TableProjectTwoAppDelegate : NSObject <UIApplicationDelegate> { UIWindow *window; IBOutlet MyTableViewController * viewController; } @property (nonatomic, retain) IBOutlet MyTableViewController * viewController; @property (nonatomic, retain) IBOutlet UIWindow *window; @end Listing 10-8 TableProjectTwoAppDelegate.m #import "TableProjectTwoAppDelegate.h" @implementation TableProjectTwoAppDelegate @synthesize window; @synthesize viewController; (void)applicationDidFinishLaunching:(UIApplication *)application { [window addSubview:self.viewController.view]; [window makeKeyAndVisible]; }(void)dealloc { [window release]; [viewController release]; [super dealloc]; } #import <Foundation/Foundation.h> @interface MyTableViewController : UITableViewController { NSArray * tableDataList; } @property (nonatomic, retain) NSArray * tableDataList; @end Listing 10-9 MyTableViewController.m #import "MyTableViewController.h" @implementation MyTableViewController @synthesize tableDataList; - (void) viewDidLoad { NSArray * tempArray = [[[NSArray alloc] initWithObjects:@"Item One", @"Item Two", @"Item Three", @"Item Four", @"Item Five", @"Item Six", @"Item Seven", @"Item Eight", @"Item Nine", @"Item Ten", @"Item Eleven", @"Item Twelve", @"Item Thirteen", @"Item Fourteen", @"Item Fifteen", @"Item Sixteen", @"Item Seventeen", @"Item Eighteen", @"Item Nineteen", @"Item Twenty", nil] autorelease]; self.tableDataList = tempArray; }(NSInteger) tableView : (UITableView *) tableView numberOfRowsInSection: (NSInteger) section { return [self.tableDataList count]; }(UITableViewCell *) tableView : (UITableView *) tableView cellForRowAtIndexPath: (NSIndexPath *) indexPath { UITableViewCell *cell = [tableView dequeueReusableCellWithIdentifier:@"acell"]; if(cell == nil) { cell = [[[UITableViewCell alloc] initWithStyle:UITableViewCellStyle Default reuseIdentifier:@"acell"] autorelease]; } cell.textLabel.text = [self.tableDataList objectAtIndex:[indexPath row]]; return cell; }(void)dealloc { [tableDataList release]; [super dealloc];} @end
You liked the article?
Like : 0
Vote for difficulty
Current difficulty (Avg): Medium
About Author

Name
TekSlate is the best online training provider in delivering world-class IT skills to individuals and corporates from all parts of the globe. We are proven experts in accumulating every need of an IT skills upgrade aspirant and have delivered excellent services. We aim to bring you all the essentials to learn and master new technologies in the market with our articles, blogs, and videos. Build your career success with us, enhancing most in-demand skills in the market.
Stay Updated
Get stories of change makers and innovators from the startup ecosystem in your inbox