Site and List Content Types
Site Content Types
When you create a content type and add it to a site's content type collection, the new content type becomes available to any child site and also to the site where it was created. For example, if you create a site content type at the root site of a site collection, that site content type becomes available on any site in the site hierarchy. If you add a new content type to a site that is lower down in the hierarchy, it is available in the site where you add it and in any sites below that site in the hierarchy.
You can review a list of the content types that are available to a site by selecting Site Settings in the user interface. When the Site Settings page appears, look for the Galleries section, and then click Site content types. To get a similar list programmatically, create an object to represent the site by instantiating the SPWeb class in server code or the Web class in client code. Then iterate through the collection that is returned by the AvailableContentTypesproperty of the object.
The collection that is returned by the AvailableContentTypes property is read-only. This is because the collection includes not only the content types that are defined on the current site but also those that are defined on sites above it in the site hierarchy. To add a new content type or to delete an existing one, you must reference a collection that you can modify. Do this by accessing the ContentTypes property of a site object. You can add content types to the collection that is returned by this property by calling the Add method, and you can delete content types by calling theDelete method.
For information about adding site content types, see How to: Add a Content Type to a Site. For information about deleting site content types, see the Delete method.
| To create or manage a content type on a site, you must have Web Designer access rights to that site. Specifically, you must have the Manage Lists and Add and Customize Pages access rights on the site where the site content type resides. |
List Content Types
Just as each site has a content type collection, so too does each list or library in a site. You add a content type to a list or library by adding it to the content type collection for the list or library.
You can create a content type collection for a new list as part of the list definition before list instances are provisioned. Within the list definition's ContentTypes element, you can reference existing site content types, and you can also define new content types. In this case, the new content types are available only to list instances that are created from the same list definition. The new content types are not part of the site collection and are not available to other lists. For more information about creating a list content type in a list definition, see How to: Add a Content Type to a SharePoint List.
After a list is provisioned, you can still add content types to the list's content type collection, but any content type that you add must already exist as a site content type that is within scope for the list. You can verify this in the user interface by inspecting the List Settings page for a list that has content types enabled. In the Content Types section of the page is a link that is labeled Add from existing site content types. Clicking the link opens a page where you can choose from available site content types and add them to the list's content type collection.
| Before adding a site content type to a list, you should first make sure that the list supports content types. To do this in the user interface, select List Settings, and then select Advanced Settings. Under Allow management of content types, click Yes. To do the same thing programmatically, get a reference to the SPList object in server code or the List object in client code; then set the ContentTypesEnabled property to true. |
To add a site content type to a list programmatically, choose a content type from the collection that is returned by the AvailableContentTypes property of an SPWeb object (server) or a Web object (client). Then add the content type to the list’s collection by accessing the ContentTypes property of the list object and calling the Add method of the collection object.
| To add a content type to a list, you must have List Administrator rights to that list. |
However, it is important to know that you cannot add every content type that is available in a given site to every list or library in the site. Any content type that you add to a document library must inherit from the built-in Document content type or from a content type that is derived from Document. Conversely, any content type that you add to a list must not derive from Document.
Designing Content Types
For a comprehensive guide to planning content types, see Planning content types and workflows. The following are some general considerations:
- Scope. Where in the site hierarchy do you want the content type to become available?
If the content type should be available throughout an entire site collection, you should deploy it in a Feature with site collection scope and write code in the FeatureActivated method of a feature receiver class that adds the content type to the root website's content type collection.
- Parent. Which existing content type that is in scope will you choose to derive your content type from?
Your content type will not activate correctly if the parent content type is not available in the website where your content type is created.
- Columns. Which existing site columns are available for you to use?
Columns that are not inherited from the parent content type must be added. Columns that do not exist must be created.
- Other Resources. Will the content type require language resources? Document templates? Forms?
If the content type requires any of these resources, you must know how they will be provisioned and how the content type will access them.
How to create a new site column in sharepoint 2010
SharePoint 2010 has a site column entity that allows you to reuse columns across multiple lists. When you create a new column in your list, you create a list column — meaning the column can be used only in that list. Site columns are created at the top-level of your team site and can be reused in any list or library within your entire team site, including sub sites. All columns you see in a list are technically list columns. When you add a site column to a list column, SharePoint copies your site column to the list to create the list column. A link is maintained between the list column and the site column. If you update the site column, you can opt to push your changes down to the list column. To create a new site column that you can use in a list or library:
- Choose Site Actions Site Settings from your top-level site.
The Site Settings Page appears.
- In the Galleries section, click the Site Columns link.
A list of site columns appears.
- Click the Create link to create a new column.
The New Site Column page appears.
- In the Column Name field, enter the name for your site column in the Name text box.
When naming your column, don't put any spaces in the name. The spaces make it hard to use your column later for queries. Instead, type the name using proper name casing, such as entering Artifact Type. You can rename the column later to Artifact Type, but the internal name remains as Artifact Type.
- Select the column type you want to use for your column by clicking a radio button next to an option in the Type of Information in This Column Is list.
You have many column type options. You also have the Managed Metadata column type.
- In the Put This Site Column Into section, indicate into which group to place your column by selecting either the Existing Group or New Group radio button.
If you select the Existing Group radio button, choose a group from the drop-down list. If you choose New Group, enter a name for the group in the New Group text box. A site column can be a member of one group.
- Enter any additional column settings that may be required by your column type by selecting radio buttons in the Additional Column Settings section.
- (Optional) In the Column Validation section, enter a formula to use to validate the values that are entered into this column in the Formula text box.
- Click OK.
Your site column appears in the list of site columns. Programmatically Create Site Column, Site Content Type in SharePoint Here is a Code snippet for creating a new Site column and adding it the site collection Site column gallery and int0 a newly created content type. public void CreateSiteColum() { string columnGroup = "Custom Columns"; // Adding Custom Column Amount string amountFieldName = site.Fields.Add("Amount", SPFieldType.Currency, false); SPFieldCurrency amountField = (SPFieldCurrency)site.Fields.GetFieldByInternalName(amountFieldName); amountField.Group = columnGroup; amountField.DisplayFormat = SPNumberFormatTypes.TwoDecimals; amountField.MinimumValue = 0; amountField.Update(); See detailed Post @ Create site column in Sharepoint 2010 /* CREATE SITE CONTENT TYPES */ string contentTypeGroup = "Custom Content Types"; // Get a Document content type to be the parent of our new custom content type. SPContentType documentCType = site.AvailableContentTypes[SPBuiltInContentTypeId.Document]; // Create the Custom Financial Document content type. SPContentType financialDocumentCType = new SPContentType(documentCType, site.ContentTypes, "Financial Document"); site.ContentTypes.Add(financialDocumentCType); // Note: A content type is not initialized until after it is added. financialDocumentCType = site.ContentTypes[financialDocumentCType.Id]; financialDocumentCType.Group = contentTypeGroup; // Add the Amount column. Child content types inherit the column. SPFieldLink amountFieldRef = new SPFieldLink(amountField); financialDocumentCType.FieldLinks.Add(amountFieldRef); // Commit changes. financialDocumentCType.Update(); } site in the above code is SPSite (or SiteCollection) Object.
How to: Add a Column to a Site
You can specify columns in a custom site definition configuration so that each time a user provisions a site of that type, Microsoft SharePoint Foundation includes the column as an available site column.
| After a user has provisioned a site, you can add site columns to that site through the SharePoint Foundation object model. |
Registering a Site Column in a Site Definition To ensure that a site column is available on every site created from a specific custom site definition configuration, you must add some Collaborative Application Markup Language (CAML) markup to the site definition configuration in the Onet.xml file of the site definition. Then, when a user provisions a site of that type, the column is included by default in the site column collection.
| Modifying the Onet.xml file for any of the built-in site types of SharePoint Foundation is not supported, so the following procedure can be used only on custom site types. |
To specify a site column in a site definition configuration
- Create the field as a separate Feature.
- Reference that Feature in theConfiguration element (in the xml file) that defines your custom site type:
- Open thexml file in %ProgramFiles%\Common Files\Microsoft Shared\web server extensions\14\TEMPLATE\SiteTemplates\site_type\XML, where site_type is name of the custom site definition.
- In theConfiguration element add a reference to the site column Feature in either the SiteFeatures orWebFeatures You identify the Feature by its GUID. The following is an example.
XML <SiteFeatures> <Feature ID="00BFEA71-1C5E-4A24-B310-BA51C3EB7A57" /> <Feature ID="695B6570-ACDC-4A8E-8545-26EA7FC1D162" /> </SiteFeatures> <WebFeatures> <Feature ID="00BFEA71-4EA5-48D4-A4AD-7EA5C011ABE5" /> <Feature ID="00BFEA71-E717-4E80-DEAF-D0C71B360101" /> </WebFeatures> For more information on the difference between these two elements, see SiteFeatures Element (Site) and WebFeatures Element (Site). If you make changes to a column that is provisioned, SharePoint Foundation never writes those changes back to the XML column definition itself. Instead, SharePoint Foundation stores updates made to columns as entries within the SharePoint Foundation database. Referencing Columns by Using Declarative XML One way to create a content type is to use declarative XML to define the content type in the element manifest file for a Feature. When the Feature is activated, the content type is created. Your content type definition can include a column by referencing it in a FieldRef element. The referenced column can be one that already exists as a site column, or it can be a new column that is created by the same Feature that creates the content type. You can also use the FieldRef element to reference a column that the content type inherits from its parent content type. In this case, your reason for referencing the column would not be to add the column but to change some of its characteristics when it is used in the content type.
To create a column reference by using declarative XML
- In the content type definition, add a FieldRef element in the FieldRefs
- Reference the column by setting the value of theID attribute of the FieldRef element to the column's ID.
The value must be the string representation of a GUID enclosed in braces, as in the following example: ID="{fa564e0f-0c70-4ab9-b863-0177e6ddd247}" The ID attribute is case-sensitive, so be sure to set the attribute to exactly the same value as the ID attribute of the Field element. You can find the IDs for built-in columns in the fieldswss.xml file, which is located on the following path: %ProgramFiles%\Common Files\Microsoft Shared\web server extensions\14\TEMPLATE\FEATURES\fields.
- Set the value of theName attribute of the FieldRef element to the same value as the Name attribute for theField element that represents the column.
- To define the column as you want, set other attributes of theFieldRef
For example, to change the text that is displayed for the column, set the value of the DisplayName attribute. Many attributes on the FieldRef element have the same name and purpose as attributes on the referenced Fieldelement. Only the value of the ID attribute and Name attributes are required to be the same. For other attributes, using a different value on the FieldRef element can change characteristics of the column when it is used in the content type without changing the referenced column itself.
| The ID, Name, DisplayName, and Required attributes on the FieldRef element are always required, even when the FieldRef element references a field that is defined in the same element manifest. |
Example
The following example shows the element manifest for a Feature that creates three site columns and two site content types. The first content type, Financial Document, is a child of the built-in Document content type. The definition for Financial Document references two of the new site columns, DateOpened and Amount. The FieldRefelement that references the DateOpened column sets the DisplayName attribute so that the column name renders as "Date" rather than "Date Opened" as defined in the site column. The definition for Purchase Order references the third new site column, CostCenter, and sets the DisplayNameattribute so that the column name renders as "Department" rather than "Cost Center" as it is defined in the site column. Purchase Order inherits the column references from its parent, Financial Document, so you do not have to reference them again. The content type also inherits a reference to the Title column from Financial Document, which inherits the column from its parent, Document. The Purchase Order type includes a FieldRef element for the Title column to override the inherited DisplayName attribute with a value of its own. XML <?xml version="1.0" encoding="utf-8"?> <Elements xmlns="http://schemas.microsoft.com/sharepoint/"> <!-- New Site Columns --> <Field ID="{1511BF28-A787-4061-B2E1-71F64CC93FD5}" Name="DateOpened" DisplayName="Date Opened" Type="DateTime" Format="DateOnly" Required="FALSE" Group="Financial Columns"> <Default>[today]</Default> </Field> <Field ID="{060E50AC-E9C1-4D3C-B1F9-DE0BCAC300F6}" Name="Amount" DisplayName="Amount" Type="Currency" Decimals="2" Min="0" Required="FALSE" Group="Financial Columns" /> <Field ID="{943E7530-5E2B-4C02-8259-CCD93A9ECB18}" Name="CostCenter" DisplayName="Cost Center" Type="Choice" Required="FALSE" Group="Financial Columns"> <CHOICES> <CHOICE>Administration</CHOICE> <CHOICE>Information</CHOICE> <CHOICE>Facilities</CHOICE> <CHOICE>Operations</CHOICE> <CHOICE>Sales</CHOICE> <CHOICE>Marketing</CHOICE> </CHOICES> </Field> <!-- Site Content Types --> <!-- Parent ContentType: Document (0x0101) --> <ContentType ID="0x0101000728167cd9c94899925ba69c4af6743e" Name="Financial Document" Group="Financial Content Types" Description="Base financial content type" Version="0"> <FieldRefs> <FieldRef ID="{1511BF28-A787-4061-B2E1-71F64CC93FD5}" Name="DateOpened" DisplayName="Date" Required="TRUE"/> <FieldRef ID="{060E50AC-E9C1-4D3C-B1F9-DE0BCAC300F6}" Name="Amount" DisplayName="Amount" Required="FALSE"/> </FieldRefs> </ContentType> <!-- Parent ContentType: Financial Document --> <ContentType ID="0x0101000728167cd9c94899925ba69c4af6743e01" Name="Purchase Order" Group="Financial Content Types" Description="Used for creating purchase orders" Inherits="TRUE" Version="0"> <FieldRefs> <FieldRef ID="{fa564e0f-0c70-4ab9-b863-0177e6ddd247}" Name="Title" DisplayName="Item" Required="TRUE" Sealed="TRUE"/> <FieldRef ID="{943E7530-5E2B-4C02-8259-CCD93A9ECB18}" Name="CostCenter" DisplayName="Department" Required="TRUE"/> </FieldRefs> </ContentType> </Elements> Supporting Unique Column Constraints The key factor in determining whether a column supports uniqueness constraints is whether that column can be indexed. Furthermore, when uniqueness is enforced on a Lookup column, the list item in the target list can have only one list item looking up to it from the child list (the list where the Lookup column lives). In other words, uniqueness is not enforced on the projected column of the target list but rather on the ID column. Column types that support the ability to be indexed, and those that are not, are listed below.
Supported Column Types
Following is a list of column types that can be indexed and for which unique column constraints are supported:
- Single line of text
- Choice field (but not multichoice)
- Number
- Currency
- Date/ Time
- Lookup (but not multivalue)
- Person or Group (but not multivalue)
- Title (but not in a document library)
Unsupported Column Types
Following is a list of column types that cannot be indexed and for which unique column constraints are not supported:
- Multiple lines of text
- Hyperlink/Picture
- Custom Field Types
- Calculated Field
- Boolean (yes/no)
- Modified by
- Modified time
- UI version
- Created time
- Checked out to
- Content type ID
Adding Columns in Content Types to Lists
Then you add a content type to a list, the columns referenced in that content type are added to the list as list columns, if they are not already in the list. The following figure shows columns being added to a list through the addition of content types. In the figure, a site content type—Specification—has three site columns that are referenced. The site content type contains a reference to the site column definition for each added column: Developer, Milestone, and Status. The site column collection contains definitions for all site columns that are available on this site. When you add the content type to a list, SharePoint Foundation copies the site content type locally as a list content type, and copies the column templates locally to the list as list columns. The list content type contains references to the list columns that are copied to the list, rather than the site columns in the site column collection at the site level. As a result, you can make local changes to a column as it appears on that list, and those changes do not affect the site column itself or list columns on other lists that inherit from that site column.  In the following figure, we show a more complex case, in which multiple site content types are added to the same list. Two site content types, Memo and Spec, are created at the site collection root site. Because of their location, these site content types are available for all other sites in the site collection to inherit. A list administrator adds both site content types to the specific list shown in the figure. At this point, SharePoint Foundation copies the site content types locally to the list as list content types. SharePoint Foundation examines the two list content types to determine which, if any, columns to add to the list. In this example, Memo references two columns, Author and Subject, while the Spec content type references three: Author, Test, and Developer. SharePoint Foundation adds the required columns. Although Author is referenced in both content types, it is only added one time to the list. In addition, if Author is a required column for the Spec content type, but not for the Memo content type, on the list it is required only for items of the Spec content type.
 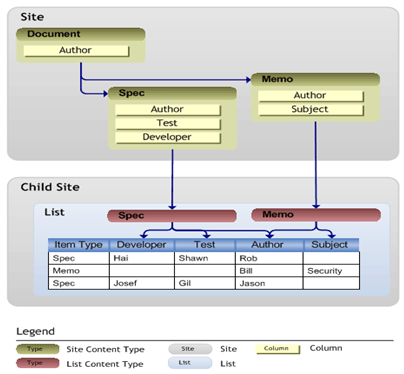 Adding Columns on a List to Content Types When you add columns directly to a list, and that list contains multiple content types, you can specify whether you want the new column to be referenced in all the content types on that list. If you do reference the column in the list content types, and you set the column as required for the list, the column is set as required within each list content type as well. However, you can later override the required setting in the specific list content types. You can also add existing list columns to the list content types on the list.
Creating a Content Type Using Declarative XML
One way to create a content type is to use declarative XML to define the content type in the element manifest file for a Feature. When the Feature is activated, the content type is created.
You can define several content types in the same element manifest file. Include a ContentType element for each content type that you define. The ID attribute is required, and the value that you specify must follow a very specific format. A correctly formatted content type ID identifies not only the new content type but also its parent content type. For more information, see Content Type IDs.
To create an ID for a content type that is derived from a built-in content type, start with the hexadecimal string that identifies the built-in content type, append two zeros, and then add a GUID with all the punctuation removed. For example, the hexadecimal string that identifies the Item content type is "0x01". The ID for a content type that derives from Item should look something like the following:
0x0100A33D9AD9805788419BDAAC2CCB37509F
To create IDs for additional content types that inherit from your content type, append "01", "02", and so on.
Another required attribute of the ContentType element is Name, which specifies a display name. The value can be a reference to a resource in the format $Resources:String. The name itself cannot be longer than 128 characters and cannot contain the characters \ / : * ? " # % < > { } | ~ &, two consecutive periods (..), or special characters, such as a tab.
When you include columns in a content type, you do not create them in the content type definition. Instead, youreference columns that have been created elsewhere. To include a column reference, add a FieldRef element as a child of the ContentType element. The referenced column can be one that already exists as a site column or a new column created by the same Feature that creates the content type.
You can also use the FieldRef element to reference a column that the content type inherits from its parent content type. In this case, your reason for referencing the column would not be add the column but to change some of its characteristics when it is used in the content type.
The ID attribute of the FieldRef element identifies the column that you are referencing. The value should be the string representation of a GUID, including braces. The value is case-sensitive.
| You can find the IDs for built-in fields in the file fieldswss.xml located on the following path: %ProgramFiles%\Common Files\Microsoft Shared\web server extensions\14\TEMPLATE\FEATURES\fields. |
If your content type uses a document template for new content, you can identify it in a DocumentTemplate element within the ContentType element. You must provision the file separately. One way to do that would be to add aModule element to the manifest and include the file with the Feature.
The content type definition can also include definitions for custom forms through an XMLDocuments element.
Example 1
The following example shows the element manifest for a Feature that creates four site columns and three site content types. The first content type, Financial Document, is a child of the built-in Document content type. The remaining two new content types, Invoice and Purchase Order, both derive from Financial Document.
The definition for Financial Document references two of the new site columns, DateOpened and Amount. The FieldRefelement that references the DateOpened column sets the DisplayName attribute so that the column name will render as "Date" instead of "Date Opened" as defined in the site column.
The Invoice content type is the first of two new content types that derive from Financial Document. The definition for the content type references a third new site column, Client, and sets the Required attribute to TRUE so that an entry is required for this field when a new item is created. The Invoice type includes a FieldRef element for the Title column, even though it is inherited, in order to change the value of the DisplayName attribute from "Title" to "Service".
The second content type that derives from Financial Document is Purchase Order. The definition for the content type references a fourth new site column, CostCenter, and sets the DisplayName attribute so that the column name will render as "Department" instead of "Cost Center" as it is defined in the site column.
Purchase Order inherits the column references from its parent, Financial Document, so you do not have to reference them again. The content type also inherits a reference to the Title column from Financial Document, which inherits the column from its parent, Document. The Purchase Order type includes a FieldRef element for the Title column in order to override the inherited DisplayName attribute with a value of its own.
Aspired to become an SharePoint? Explore the post to discover the know-hows on SharePoint training course.
XML: <?xml version="1.0" encoding="utf-8"?> <Elements xmlns="http://schemas.microsoft.com/sharepoint/">
<!-- Document Templates -->
<Module Name="InvoiceDocumentTemplate" Path="FinancialDocuments" Url="_cts/Invoice" RootWebOnly="TRUE"> <File Url="Invoice.docx" Type="Ghostable" /> </Module>
<Module Name="PurchaseOrderDocumentTemplate" Path="FinancialDocuments" Url="_cts/PurchaseOrder" RootWebOnly="TRUE"> <File Url="PurchaseOrder.docx" Type="Ghostable" /> </Module> <!-- Site Columns -->
<Field ID="{060E50AC-E9C1-4D3C-B1F9-DE0BCAC300F6}" Name="Amount" DisplayName="Amount" Type="Currency" Decimals="2" Min="0" Required="FALSE" Group="Financial Columns" />
<Field ID="{86811853-7E52-4515-A88D-A8FA9D450905}" Name="Client" DisplayName="Client Name" Type="Text" Required="FALSE" Group="Financial Columns"/>
<Field ID="{1511BF28-A787-4061-B2E1-71F64CC93FD5}" Name="DateOpened" DisplayName="Date Opened" Type="DateTime" Format="DateOnly" Required="FALSE" Group="Financial Columns"> <Default>[today]</Default> </Field>
<Field ID="{943E7530-5E2B-4C02-8259-CCD93A9ECB18}" Name="CostCenter" DisplayName="Department" Type="Choice" Required="FALSE" Group="Financial Columns"> <CHOICES> <CHOICE>Administration</CHOICE> <CHOICE>Information</CHOICE> <CHOICE>Facilities</CHOICE> <CHOICE>Operations</CHOICE> <CHOICE>Sales</CHOICE> <CHOICE>Marketing</CHOICE> </CHOICES> </Field>
<!-- Site Content Types -->
<!-- Parent ContentType: Document (0x0101) --> <ContentType ID="0x0101000728167cd9c94899925ba69c4af6743e" Name="Financial Document" Group="Financial Content Types" Description="Base financial content type" Version="0"> <FieldRefs> <FieldRef ID="{1511BF28-A787-4061-B2E1-71F64CC93FD5}" Name="DateOpened" DisplayName="Date" Required="TRUE"/> <FieldRef ID="{060E50AC-E9C1-4D3C-B1F9-DE0BCAC300F6}" Name="Amount" DisplayName="Amount" Required="FALSE"/> </FieldRefs> </ContentType>
<!-- Parent ContentType: Financial Document --> <ContentType ID="0x0101000728167cd9c94899925ba69c4af6743e01" Name="Invoice" Group="Financial Content Types" Description="Used for creating customer invoices" Inherits="TRUE" Version="0"> <FieldRefs> <FieldRef ID="{fa564e0f-0c70-4ab9-b863-0177e6ddd247}" Name="Title" DisplayName="Service" Required="TRUE" Sealed="TRUE"/> <FieldRef ID="{86811853-7E52-4515-A88D-A8FA9D450905}" Name="Client" DisplayName="Client Name" Required="TRUE"/> </FieldRefs> <DocumentTemplate TargetName="Invoice.docx" /> </ContentType>
<!-- Parent ContentType: Financial Document --> <ContentType ID="0x0101000728167cd9c94899925ba69c4af6743e02" Name="PurchaseOrder" Group="Financial Content Types" Description="Used for creating purchase orders" Inherits="TRUE" Version="0"> <FieldRefs> <FieldRef ID="{fa564e0f-0c70-4ab9-b863-0177e6ddd247}" Name="Title" DisplayName="Item" Required="TRUE" Sealed="TRUE"/> <FieldRef ID="{943E7530-5E2B-4C02-8259-CCD93A9ECB18}" Name="CostCenter" DisplayName="Department" Required="TRUE"/> </FieldRefs> <DocumentTemplate TargetName="PurchaseOrder.docx"/> </ContentType>
</Elements>
You liked the article?
Like : 0
Vote for difficulty
Current difficulty (Avg): Medium
About Author

Name
TekSlate is the best online training provider in delivering world-class IT skills to individuals and corporates from all parts of the globe. We are proven experts in accumulating every need of an IT skills upgrade aspirant and have delivered excellent services. We aim to bring you all the essentials to learn and master new technologies in the market with our articles, blogs, and videos. Build your career success with us, enhancing most in-demand skills in the market.
Stay Updated
Get stories of change makers and innovators from the startup ecosystem in your inbox