Create Visual Web Parts by Using SharePoint 2010 Controls
Create a SharePoint Visual Web Part Project
In this task, you create a Visual Web Part SharePoint 2010 project in Microsoft Visual Studio 2010.
To create the project
- Start Visual Studio 2010.
- On the File menu, point to New, and then click Project.
- In the New Project dialog window, in the Installed Templates section, click Visual C#, click SharePoint, and then click 2010.
- From the project items, click Visual Web Part.
- In the Name box, type ProjectsListWebPart and then click OK.
- In the SharePoint Customization Wizard, type the URL of the local website that you want to use for this exercise (such as http://localhost/SampleWebSite).
- For the trust level, select Deploy as a farm solution and then click Finish.
Desired to gain proficiency on SharePoint? Explore the blog post on the "SharePoint Training" course to become a pro in SharePoint.
Create a Projects Listing Web Part
In this task, you add SharePoint and ASP.NET controls to the Web Part. Then you add code to query the Projects list and return those items that are less than or equal to a specified date.
To customize the Web Part
- In Solution Explorer, double-click webpart.
- Change the Title property in the VisualWebPart1.webpart file to Projects List Web Part.
- Add the following code to the end of the existing code in VisualWebPart1UserControl.ascx. This code adds a SharePoint ListViewByQuery control, an ASP.NET Label control, and a SharePoint DateTime control. You can achieve the same thing by dragging the controls from the toolbox onto the VisualWebPart1UserControl.ascx file screen. Make sure that the ID attribute values match the values in the following code.
XML <SharePoint:ListViewByQuery runat="server" ID="ProjectsListView" /> <br /> <asp:Label ID="Label1" runat="server" Text="Items due by:" /> <SharePoint:DateTimeControl ID="DueDate" AutoPostBack="true" OnDateChanged="OnDate_Changed" DateOnly="true" runat="server"> </SharePoint:DateTimeControl>
- In Solution Explorer, right-click ascx and then click View Code.
- Add the following using
using Microsoft.SharePoint; using Microsoft.SharePoint.Utilities; using System.Web;
- Add the following code to the body of the Page_Load
DateTime dueDate = DateTime.Now; if (!string.IsNullOrEmpty(Request.QueryString["date"])) { dueDate = DateTime.Parse(Request.QueryString["date"]); } DueDate.SelectedDate = dueDate; SPWeb home = SPContext.Current.Web; ProjectsListView.List = home.Lists["Projects"]; SPQuery query = new SPQuery(ProjectsListView.List.DefaultView); query.ViewFields = "<FieldRef Name="Title" /><FieldRef Name="Due_x0020_Date" />"; query.Query = string.Format( "<Where><Leq><FieldRef Name="Due_x0020_Date" /><Value Type="DateTime">{0}</Value></Leq></Where>" , dueDate.ToString("s")); ProjectsListView.DisableFilter = true; ProjectsListView.DisableSort = true; ProjectsListView.Query = query;
- Add the following code after the Page_Load
protected void OnDate_Changed(object sender, EventArgs e) { SPUtility.Redirect(SPContext.Current.ListItem.Name , SPRedirectFlags.Default , HttpContext.Current , string.Format("date={0}", DueDate.SelectedDate.ToString("d"))); }
- In Solution Explorer, right-click ProjectsListWebPart and then click Deploy.
When the project deploys successfully, go to the next section.
Test the Solution
In this task, you test the solution by adding the Web Part to the Home page of the website specified previously.
To add test the solution
Open the website.
- On the Home page, at the top of the page, click Edit.
- On the ribbon, under Editing Tools, click the Insert
- Click Web Part and then under Categories, select Custom as shown in Figure 1. The Projects List Web Part appears in the list of Web Parts.
Figure 1: Web part insert screen 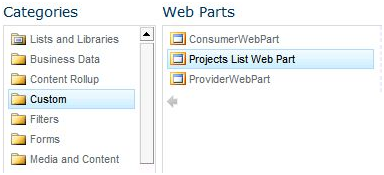
- On the ribbon, click Save & Close. Click Yes if the Save Changes dialog screen appears.
You now have your new Web Part listing projects as shown in Figure 2. Figure 2: Web part listing projects 
- Click the DateTime list and scroll back to 12/1/2009. The number of items displayed should decrease by one.
Create a Visual Web Part in SharePoint Designer 2010
In this task, create a Visual Web Part in Microsoft SharePoint Designer 2010.
To create the visual Web Part
- Start SharePoint Designer 2010 by clicking Start Menu, then click All Programs, click Microsoft Office, and then click Microsoft SharePoint Designer 2010.
- Click the Open Site button and in the Open Site dialog window, type the URL of the local Web site (such as http://localhost/SampleWebPartSite) in the Site Name
- From the SharePoint Site left navigation pane, click the Site Pages tab, and then click aspx.
- On the ribbon menu, click Edit File, and then click Edit File in Advanced Mode. Ignore any errors that you may see on this screen by clicking OK.
- On the Home view tab, click Code at the bottom of the designer pane to show the code view.
In the code screen, scroll to the bottom of the page and place the pointer before the </ContentTemplate> end tag (after the </WebPartPages:WebPartZone> closing tag) as shown in below Figure 1. Figure 1. Place the pointer before the </ContentTemplate> tag 
- Click the Insert tab on the ribbon, and then click Data View.
- In the drop-down list, click Employees. The SharePoint Designer adds the XsltListViewWebPart Web Part to the Home page.
- Click Save at the top of the page. If you are prompted for confirmation, click Yes.
- Open the browser to the Web site that you specified earlier. At the bottom of the Home page, you should see the XsltListViewWebPart Web Part as shown in Figure 2.
Figure 2. XsltListViewWebPart Web Part lists employees 
Modify the XSLT List View Web Part
In this task, modify the Web Part to add formatting and to limit the number of items displayed.
To modify XSLT List View Web Part
- Return to SharePoint Designer 2010and in the design view (click Design at the bottom of the screen), click the table cell that contains the word Title.
- In the Apply Styles window on the lower right of the screen, in the Select CSS style to apply pane, scroll down in the Select CSS style to apply pane and then click .ms-bodyareapagemargin. Right-click and then click Apply Style as shown in Figure 3. If the Apply Styles window is not displayed, on the View tab, click Apply Styles under the Task Panes
Figure 3. Apply a new style to the employee's list 
- In the code view of the designer (click Code at the bottom of the screen), scroll up to RowLimit and change the value to 5.
In the code view of the designer, scroll up to WebPartPages:XsltListViewWebPart and type the ChromeType attribute, and then select TitleAndBorder as the chrome type as shown in Figure 4. Figure 4. Select the chrome type 
- Click Save at the top of the page.
Test the Project
In this task, you verify that the Web Part is displayed and that only five items are shown per page.
To test the project
- Open a Web browser to the Web site that you specified previously. You should now see the modified XsltListViewWebPart Web Part listing (similar to Figure 2) with only five employees listed per page.
- Click the right arrow at the bottom of the screen to see the next list item.
You liked the article?
Like : 0
Vote for difficulty
Current difficulty (Avg): Medium
About Author

Name
TekSlate is the best online training provider in delivering world-class IT skills to individuals and corporates from all parts of the globe. We are proven experts in accumulating every need of an IT skills upgrade aspirant and have delivered excellent services. We aim to bring you all the essentials to learn and master new technologies in the market with our articles, blogs, and videos. Build your career success with us, enhancing most in-demand skills in the market.
Stay Updated
Get stories of change makers and innovators from the startup ecosystem in your inbox